Add data to Gatsby's Data layer using sourceNodes
In this post i’m going to demonstrate how to source data from a NASA API and inject the response into Gatsby’s GraphQL layer without the use of a source plugin.
All Gatsby source plugins will use the same approach as outlined below and if you find yourself in a situation where there’s no suitable source plugin available to install you could use the following approach to roll your own solution.
If you’d prefer to jump ahead here’s a demo repo: https://github.com/PaulieScanlon/nasa-data-source
… and a live demo can be seen here: https://nasadatasource.gatsbyjs.io/
sourceNodes
To source data from a remote source and add it to Gatsby’s data layer you can use the sourceNodes extension point from
within gatsby-node.js
sourceNodes has been designed to run at an appropriate time during the build process to allow you to inject your own
data.
Here’s a brief list of the Gatsby’s build steps, the full list can be seen here: Understanding Gatsby build | build steps
NB: There are some subtle differences between the build steps when running gatsby develop vs gatsby build
success open and validate gatsby-configs - 0.062 s
success load plugins - 0.915 s
success onPreInit - 0.021 s
success delete html and css files from previous builds - 0.030 s
success initialize cache - 0.034 s
success copy gatsby files - 0.099 s
success onPreBootstrap - 0.034 s
success source and transform nodes - 0.121 s
success Add explicit types - 0.025 s
success Add inferred types - 0.144 s
You’ll see near the bottom of the snippet: success source and transform nodes. It’s here where you can source your own data and make it available to query via GraphQL by using createNode, more on that in a moment.
It’s also worth noting next to each build step is a timestamp in seconds. You’ll see next to success source and transform nodes it says 0.121 s, naturally this varies slightly depending on which version of Node you’re running and i’ve heard tells that Windows runs Node slower than Mac. 🤷♂️
But… the most important thing I’d like to make clear here is when you source your own data during this build step depending on the response time of the API you’re requesting data from and the amount of data you’re sourcing can have an impact on this time.
If you’re attempting to download a million 4k videos from a remote server on the moon this build step will likely take much longer to complete. You’ve probably seen comments on Twitter regarding slow Gatsby build times, these comments seldom mention how much data is being sourced, and from where.
Source Plugins
As great as source plugins are, you might find yourself experiencing some of these slow build time issues but because you’re using a source plugin it might be hard to resolve them since you don’t have access to Gatsby’s underlying methods.
My motivation for writing this post is for precisely this reason. You might not need a plugin and by rolling your own solution it’s quite likely you can source a smaller data payload which could help bring your build times back up to speed.
Pre-Flight Checks
To use the NASA API you’ll need an API key, you can get that from NASA’s API Site: https://api.nasa.gov
You’ll also need a gatsby-node.js at the root of you project:
...
src
gatsby-node.js
package.json
And finally since I’ll be requesting data on the server rather than in browser I’ll be using axios
yarn add axios # npm install axios --save
The Code
Ok, with all of the above in place add the below to your gatsby-node.js file. You’ll need to add your own API to the
request string.
// gatsby-node.js

const axios = require('axios');

exports.sourceNodes = async ({ actions, createNodeId, createContentDigest }) => {
  const { data } = await axios.get(`https://api.nasa.gov/planetary/apod?api_key=YOUR_API_KEY`);

  actions.createNode({
    ...data,
    id: createNodeId(data.date),
    internal: {
      type: 'apod',
      contentDigest: createContentDigest(data),
    },
  });
};
Starting at the top I define and export sourceNodes. sourceNodes can be an async function and accepts a number
parameters including but not limited to the following.
- actions
- createNodeId
- createContentDigest
actions
I’ve refereed to Gatsby’s data layer a number of times and at the time of writing this post, This is actually Redux.
Actions are the equivalent to actions bound with bindActionCreators in
Redux. One of the parameters. actions contains a function called
createNode and this is how you add data to
the Redux state object / Gatsby’s data layer
createNodeId
This is effectively a helper function that aids in the creation of unique id’s. Under the hood Gatsby are using uuid, you can of course use your preferred method but since uuid is already part of the Gatsby bundle it makes sense to use it.
createContentDigest
This again is a helper function provided by Gatsby that allows for the creation of a content digest. createContentDigest is used to determine if data has changed or has remained the same since the last build.
actions.createNode
To create a node there’s a few things Gatsby requires, and below is the absolute minimum set of parameters you’ll need. The full list of accepted parameters can be seen in the docs
// gatsby-node.js // snippet from above
actions.createNode({
  ...data,
  id: createNodeId(data.date),
  internal: {
    type: 'apod',
    contentDigest: createContentDigest(data),
  },
});
data
The ...data is the data returned by the NASA API. It’s a single object rather than an array of objects. I spread this
straight into my new node, you can of course abstract the response and only inject the data you need.
id
Every node needs an id, i’m not 100% clear on why, but id’s are usually required to ensure data is uniquely identifiable
internal.type
This is where you can define a type. In the above i’ve defined this as apod. APOD is the NASA API endpoint i’m using
and stands for Astronomy Picture of the Day. This internal type is what you’ll use later when querying the data using
GraphQL.
internal.contentDigest
As above, each node requires a contentDigest to enable stale node detection
Run develop
At this point you should be able to run gatsby develop, if there’s no errors you’re in a good place.
GraphiQL
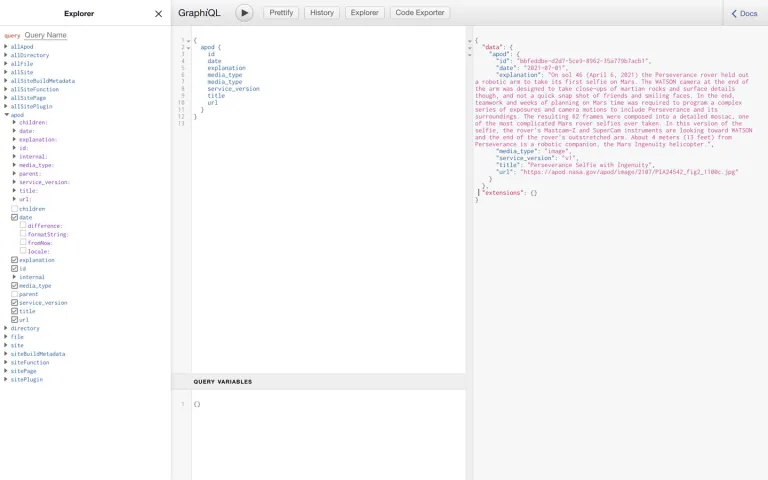
With the node created you should be able to see the apod type in the GraphiQL explorer. Visit
http://localhost:8000/___graphql to investigate. If you’ve used the APOD API as
i’ve done the accepted query types are as follows.
You’ll notice i’m using the singular apod query name. Gatsby will create two queries for you, the singular as seen
below but also a plural, prefixed by all, E.g allApod. As mentioned above the data returned by the NASA API is an
object rather than an array of objects.
{
  apod {
    id
    date
    explanation
    media_type
    service_version
    title
    url
  }
}
Which should give you a response similar to the below
{
  "data": {
    "apod": {
      "id": "bbfeddbe-d2d7-5ce9-8962-35a779b7acb1",
      "date": "2021-07-01",
      "explanation": "On sol 46 (April 6, 2021) the Perseverance rover held out a robotic arm to take its first selfie on Mars. The WATSON camera at the end of the arm was designed to take close-ups of martian rocks and surface details though, and not a quick snap shot of friends and smiling faces. In the end, teamwork and weeks of planning on Mars time was required to program a complex series of exposures and camera motions to include Perseverance and its surroundings. The resulting 62 frames were composed into a detailed mosiac, one of the most complicated Mars rover selfies ever taken. In this version of the selfie, the rover's Mastcam-Z and SuperCam instruments are looking toward WATSON and the end of the rover's outstretched arm. About 4 meters (13 feet) from Perseverance is a robotic companion, the Mars Ingenuity helicopter.",
      "media_type": "image",
      "service_version": "v1",
      "title": "Perseverance Selfie with Ingenuity",
      "url": "https://apod.nasa.gov/apod/image/2107/PIA24542_fig2_1100c.jpg"
    }
  }
}
This confirms that the node was created successfully and can be queried by GraphQL in your React component or page.
Jsx
My preferred method for querying non page queries in Gatsby is to use useStaticQuery. Here’s a query that i’ve used in
the index.js and I return it using
some simple un-styled HTML
// index.js

import React from 'react';
import { useStaticQuery, graphql } from 'gatsby';

const IndexPage = () => {
  const {
    apod: { id, date, explanation, media_type, service_version, title, url },
  } = useStaticQuery(graphql`
    query {
      apod {
        id
        date
        explanation
        media_type
        service_version
        title
        url
      }
    }
  `);

  return (
    <main>
      <p>{date}</p>
      <h1>{title}</h1>
      <p>{explanation}</p>
      <img alt={title} src={url} />
      <p>{`id: ${id}`}</p>
      <p>{`media_type: ${media_type}`}</p>
      <p>{`service_version: ${service_version}`}</p>
    </main>
  );
};

export default IndexPage;
… and there you have it, data sourcing without plugins! I’ve used this approach many times in various projects and covered it quite conclusively with Benedicte Raae on our pokey internet show Gatsby Deep Dives with Queen Raae and the Nattermobs Pirates
Stay tuned for the next post where i’ll explain how to convert the image url GraphQL type from “string” to “file” using createSchemaCustomization so it can be used with the new and improved gatsby-plugin-image