How to Create Image Slices Using Sharp
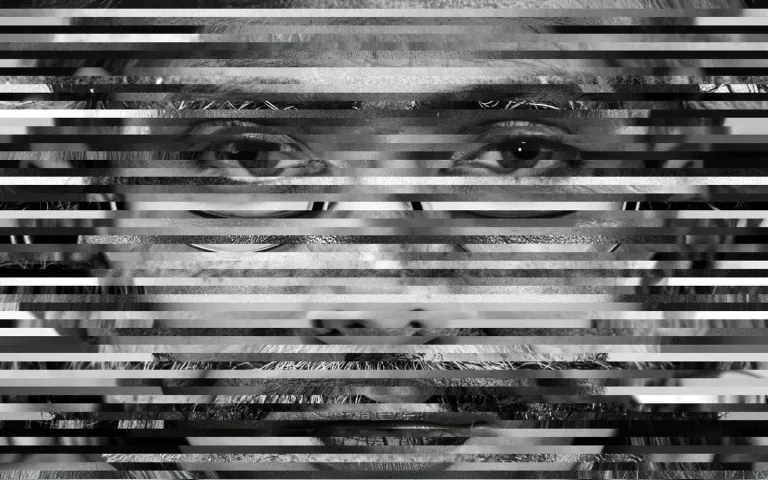
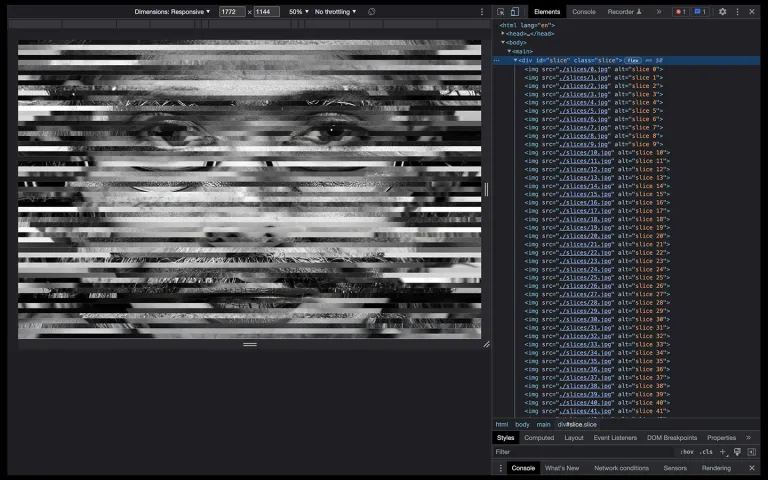
Hey there, ok, this is a failed experiment, but it’s October, Halloween is on the way and my experiment into image slicing produced a pretty spooky result!
Failed Experiment
I was planning on using the method described in this post to create a “hero image” for use in a demo site about Gatsby’s upcoming Slice API, but the result was too harrowing and feels like it’s better suited as a title frame for a Netflix documentary about serial killers.
What do you think?
It is however quite an interesting use of Sharp, and rather than waste my efforts I thought I’d write about how I created the effect.
Sharp
For those who don’t know, Sharp is what powers some of the image manipulation techniques used by gatsby-plugin-image. Sharp was created by Lovell Fuller, who, weirdly, interviewed me once for a short contract at LVMH Moët Hennessy Louis Vuitton.
I never worked with Lovell as he was on PTO during my contract, but some years later I met him at Gatsby Days London, 2019 — Lovely stuff!
Anyway…
Here’s a Live Preview and Repository of the output.
- 🚀 Live Preview
- ⚙️ Repository
Slice
If you inspect the DOM in the Live Preview you’ll see the page is displaying x60 separate images one after the other, which together, form that terrifying human face. Here are the steps I took to create each of the slices.
Source Images
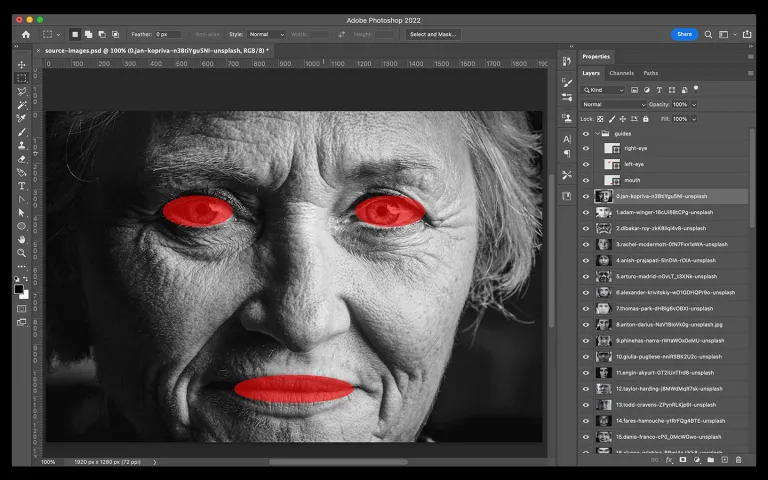
I started by searching Unsplash using the key words “people faces” and added the search filter “black and white”, and then slowly downloaded and resized each of the images so the eyes and mouths were in approximately the same positions within my .psd (PhotoShop document). I added some guides (opaque red ovals) to help with the alignment. I should have known at this point the result was gonna be wild!
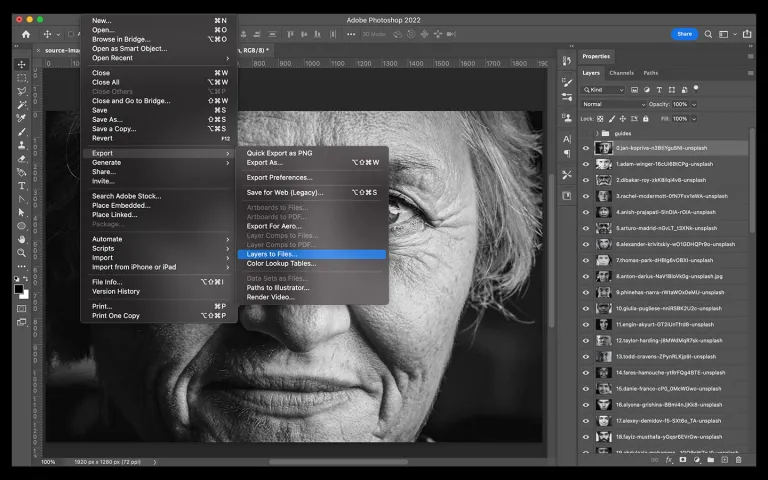
I then used PhotoShop’s “Export > Layers to Files” which as you might imagine, exports each layer to a file. The output can be seen in the repository here: sharp-image-manipulation/images/
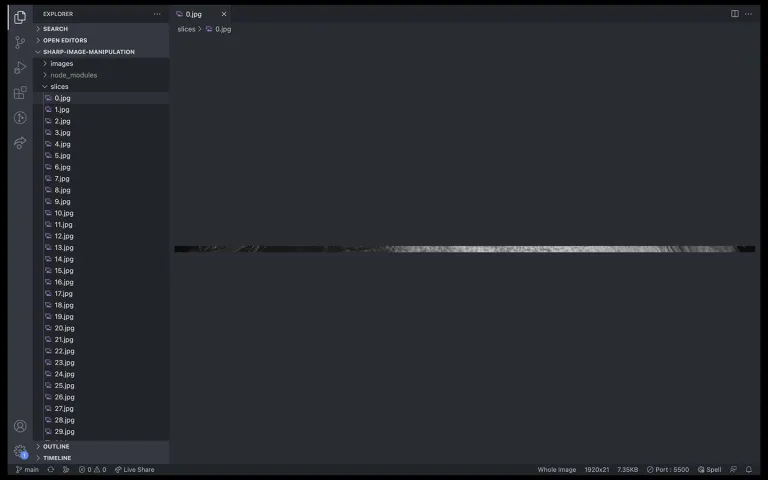
With all the source images exported I could now read the directory, slice each image, and output the slice into a new directory. You can see the output of the slices in the repository here: sharp-image-manipulation/slices/.
Slice Function
In this next bit I’ll explain how I used a combination of node, to read the source directory and iterate over each
image, and Sharp to extract a slice from each image and save it in the slices directory.
Dependencies
The only dependency required is sharp.
npm install sharp
To run this function type the following in your terminal
node run
Initial setup
// run.js

const fs = require('fs');
const util = require('util');
const sharp = require('sharp');

const readDir = util.promisify(fs.readdir);
const makeDir = util.promisify(fs.mkdir);

const inputPath = './images';
const outputPath = './slices';

const run = async () => {
  if (fs.existsSync(outputPath)) {
    fs.rmSync(outputPath, { recursive: true });
    await makeDir(outputPath);
  } else {
    await makeDir(outputPath);
  }
};

run();
- The
runfunction is asynchronous and initially checks if theoutputPathexists, if it does, it removes the directory and anything contained within it, it then creates a new empty directory.
Create Slices
This part of the function reads the inputPath / source directory, iterates over each image and creates a slice.
const fs = require('fs');
const util = require('util');
const sharp = require('sharp');

const readDir = util.promisify(fs.readdir);
const makeDir = util.promisify(fs.mkdir);

const inputPath = './images';
const outputPath = './slices';

const run = async () => {
  if (fs.existsSync(outputPath)) {
    fs.rmSync(outputPath, { recursive: true });
    await makeDir(outputPath);
  } else {
    await makeDir(outputPath);
  }

+  const images = await readDir(inputPath);
+  const sliceHeight = Math.floor(1280 / images.length);

+  images.forEach(async (file, index) => {
+    try {
+      const top = sliceHeight * index;
+      const input = `${inputPath}/${file}`;
+      const output = `${outputPath}/${index}.jpg`;
+
+      await sharp(input).extract({ width: 1920, height: sliceHeight, left: 0, top: top }).toFile(output);
+    } catch (error) {
+      console.error(error);
+    }
+  });
};

run();
-
images: This const will be an array of the images contained within theinputPathdirectory -
sliceHeight: ThesliceHeightis calculated by using the source image height of1280pxand dividing it by the amount of images. In the case of this experiment there are 60 images, so the height of each slice will be approx21px.1280 / 60 = 21
To create a slice using Sharp I used extract with a dynamically
created top position.
const top = sliceHeight * index;
The top position increases on each iteration of the forEach by multiplying the sliceHeight value by the value of
the index.
- The
topposition for the first image would be:21 x 0 = 0. - The
topposition for the second image would be:21 * 1 = 21, - The
topposition for the third image would be:21 * 2 = 42, and so on.
The top position is used as a value within .extract().
.extract({ width: 1920, height: sliceHeight, left: 0, top: top });
I also use the index value to create the “slice” file name.
const output = `${outputPath}/${index}.jpg`;
This is passed to .toFile() which creates the actual image “slice” file.
.toFile(output)
You can see the src for the run function in the repository here:
sharp-image-manipulation/run.js
The result
The result of the run function should be x60 images named 0 - 59.jpg.
These are then displayed in the HTML page in individual <img /> elements. Some additional styling has been added to
“stack” the images one on top of the other.
There’s probably some extra stuff I could do to merge all of the slices back together and create a single image, but that’s an experiment for another day.
There’s a ton of other stuff Sharp can do, for instance you might like to play around with color manipulation to add a tint to each of the slices. Here’s the Color manipulation API from the docs.
As it stands I don’t have a need for this, but it’s nice to tinker with stuff and I hope you now have a better understanding of Sharp and perhaps even some of the leg work Gatsby does under the hood when optimizing images automatically for you.