Getting Started With CockroachDB, pg-promise and Next.js
In this guide you should find everything you need to get started with CockroachDB, pg-promise and Next.js (API Routes). But, before I dive in I’d like to explain my “why”.
This article by @PaulieScanlon is a couple of months old but it’s so well written that I had to include ithttps://t.co/X1jYk84xji
— Erfan (@ErfanEbrahimnia) May 6, 2023
Getting Started Resources
Cockroach Labs have a number of ways to help you get going, and depending on where you are with you learning journey and the technology you’re familiar with, you can chose where to start.
- Cockroach University
- Build a Simple CRUD Node.js App with CockroachDB and the node-postgres Driver
- Deploy a Web App Built on CockroachDB with Vercel
Unfortunately for me none of the above suited my needs. The sample app I’ve created for this guide however, does.
If you’re keen to jump ahead you can see the sample app and code on the links below.
- 🚀 Live Preview: https://cockroachdb-pg-promise-nextjs.vercel.app/
- ⚙️ Repository: https://github.com/PaulieScanlon/cockroachdb-pg-promise-nextjs
Modern FrontEnds
You probably know this already but, in the “Jamstack”, the lines between frontend and the server are somewhat blurred, and the concept of building a web application that has a frontend and a separate node.js server are becoming a thing of the past.
Using a framework like Next.js (there are many others) you can develop your frontend code alongside your server-side code in the same project. In cases when using Next.js getServerSideProps, you’ll not only develop your server-side code in the same project, you’ll develop your server-side code in the same page as your frontend code! Both together can be deployed to a single CDN like Vercel.
Because of this shift I’ve written this guide to help you get started with CockroachDB in the Jamstack era.
SQL / pg-promise
In my opinion, node-postgres and pg-promise are the closest you can get to writing SQL in a node.js environment. In this post I’ll be using pg-promise.
There are JavaScript abstractions like Prisma which will allow you to interact with an SQL database from a node.js environment but, by using Prisma you’ll be writing Prisma specific JavaScript syntax rather than SQL.
cockroach sql
There’s one other “tool” I think you’ll want to be aware of called cockroach sql. I’ve found this to be super helpful for initial setup of tables and having a quick look at whats in the database. I haven’t really been using it to query specific data or mutate data stored within the database… that’s the bit pg-promise will do through the app interface.
I’ll be using cockroach sql later in this guide so if you don’t have cockroach sql installed, go ahead and do that now.
Getting Started With CockroachDB
Before you do anything you’ll need a free CockroachDB account, sign up before continuing.
Create a CockroachDB Cluster
You should be looking at a page similar to the below. Click the Create Cluster button.
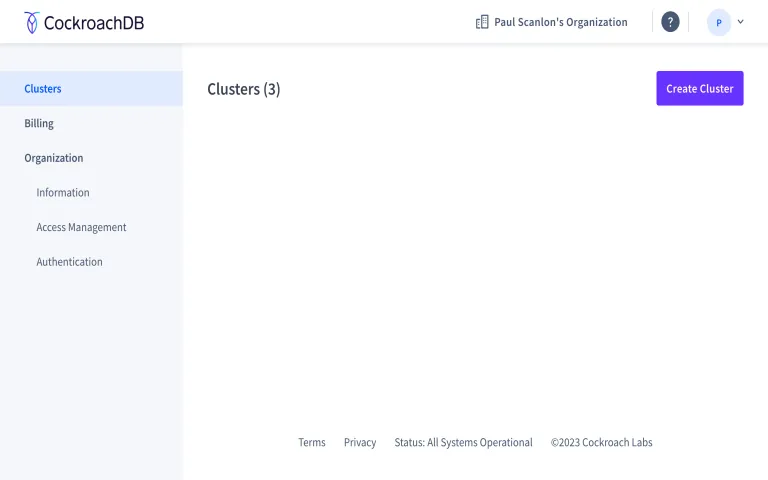
Setup a CockroachDB Cluster - 1
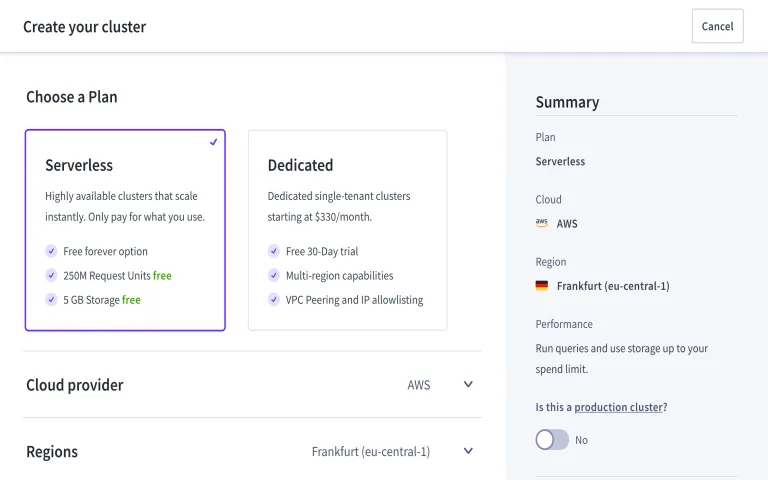
For the purposes of this guide I’ll be using CockroachDB Serverless, select Severless and scroll down.
Setup a CockroachDB Cluster - 2
CockroachDB is cloud native. CockroachDB can be deployed to Amazon Web Services (AWS) and Google Cloud Platform (GCP).
It’s not overly important at this stage of getting started to know why to chose one Cloud provider over the other but, just for completeness, this is a super valuable feature of CockroachDB as it allows companies to avoid “vendor lock in”.
You can also select which regions you’d like your database deployed to. Generally speaking you’ll choose a region that is close to your Serverless Function region and / or your users.
At present CockroachDB Serverless can only run in a single region. Multi-Region Serverless is launching soon so I’d suggest you give CockroachDB a follow on Twitter so you don’t miss the launch.
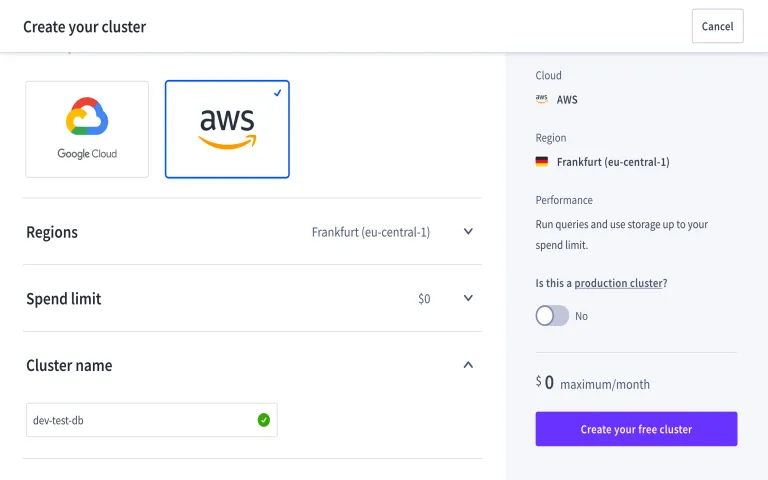
Lastly, give your Cluster a name. Choose wisely as this can’t be changed later!. I’ve been prefixing the names with either dev- or prod- so I can more easily switch between databases whilst developing. I’ll cover this later when discussing Next.js environment variables.
When you’re done, click the Create your free cluster button.
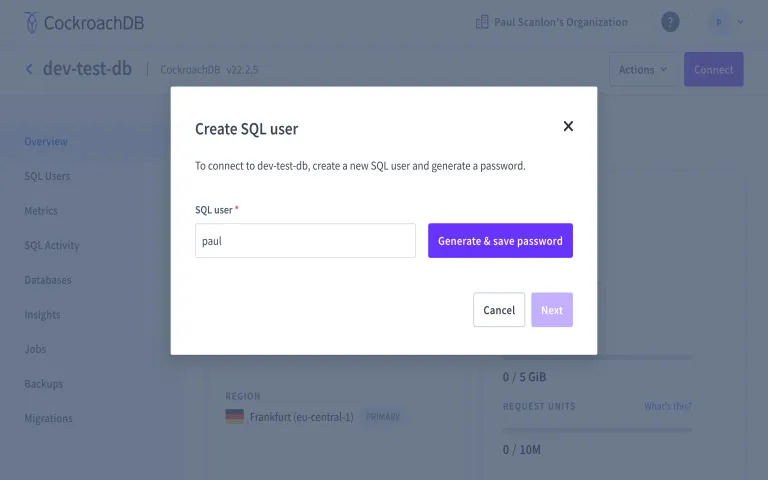
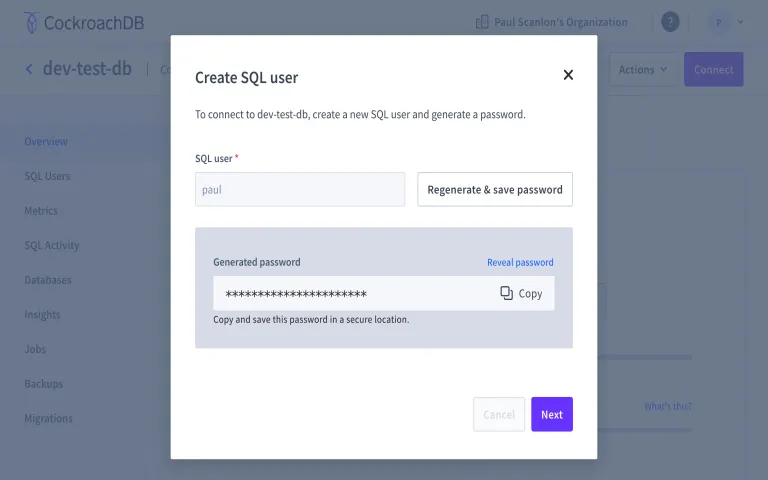
Create SQL User - name
My name is Paul so I created a user called Paul 🤷. When you’ve entered an SQL user name click the Generate & save password button, and then click the Next button.
Create SQL User - password
This step isn’t entirely required as the password can be revealed in the next step but, if you wanna be super safe, copy the password and save it somewhere, then click the Next button when you’re ready.
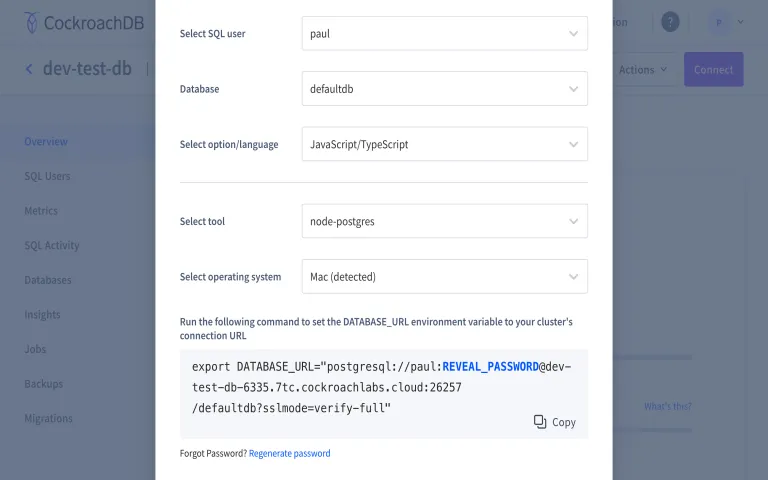
Create SQL User - DATABASE_URL
There are a couple of options available via the various select inputs, for the purposes of this guide you can use the options I’ve selected in the image below. These are:
- Database:
defaultdb - Select option/language:
JavasScript/TypeScript - Select tool:
node-postgres - Selection operating system:
(automatically detected)
When you’re ready you can now copy the connection string and save it somewhere safe.
☝️ One thing to be aware of when using the Copy button 👇.
The connection string includes export DATABASE_URL="...". You won’t need the export bit. This is helpful for when
developing node.js applications and when run in a terminal will export the connection string to your terminal session,
but when you close your terminal window it’ll be gone.
When using Next.js you’ll be saving this variable in one of the .env files. More on that in moment.
Delete the word export and save the connection string somewhere safe. Here’s a diff.
- export DATABASE_URL="..."
+ DATABASE_URL="..."
Repeat For Production
As mentioned, I’ve been prefixing the Cluster name with dev- or prod-. Repeat the above steps and create a second Cluster that will be used in production later when you deploy your Next.js app.
Cluster Overview
You should now be looking at a page similar to the below. You probably won’t need to go back into the CockroachDB Cloud Console but maybe bookmark the page just in case.

Connecting to a Cluster with cockroach sql
It’s now time to test you can connect to your CockroachDB Cluster using cockroach sql.
Open a new terminal window and type the following. Paste your connecting string in between the quote marks, and don’t
forget the ; at the end of the line. All statements must be terminated by a semicolon.
cockroach sql --url="";
Full example
cockroach sql --url="postgresql://paul:<ENTER-SQL-USER-PASSWORD>@dev-test-db-6335.7tc.cockroachlabs.cloud:26257/defaultdb?sslmode=verify-full";
If the connection was successful you should be seeing something similar to the below.
# Welcome to the CockroachDB SQL shell.
# All statements must be terminated by a semicolon.
# To exit, type: \q.
#
# Client version: CockroachDB CCL v22.2.4 (aarch64-apple-darwin21.2, built 2023/02/13 17:52:58, go1.19.4)
# Server version: CockroachDB CCL v22.2.5 (x86_64-pc-linux-gnu, built 2023/02/16 16:23:05, go1.19.4)
# Cluster ID: ddf31a83-ff79-4701-3dab-ffca12c6ea40
#
# Enter \? for a brief introduction.
#
paul@dev-test-db-6335.7tc.cockroachlabs.cloud:26257/defaultdb>
If you wish to escape cockroach sql at any time you can type the word exit and hit enter.
Creating a table with cockroach sql
At this point you will have a Cluster and a database. To double check this, run the following in your terminal. (assuming the cockroach sql session is still running)
SHOW DATABASES;
You should be looking at something similar to the below.
  database_name | owner | primary_region | secondary_region | regions | survival_goal
----------------+-------+----------------+------------------+---------+----------------
  defaultdb     | root  | NULL           | NULL             | {}      | NULL
  postgres      | root  | NULL           | NULL             | {}      | NULL
  system        | node  | NULL           | NULL             | {}      | NULL
(3 rows)
However, you’ll still need to create a table. You can see what I mean if you run the following in your terminal.
SHOW TABLES;
Which will likely result in something similar to the below.
SHOW TABLES 0
If you’re planning to use my sample app without modification you can create a table using the schema below.
Most of the data types used are standard SQL data types with the
exception of the id. Rather than using AUTO_INCREMENT, with CockroachDB you can use a helper function called
gen_random_uuid. You can read more about that in the docs here:
UUID
Run the following in your terminal to create a table called locations.
CREATE TABLE locations (
  id       UUID DEFAULT gen_random_uuid() PRIMARY KEY,
  date     DATE,
  city     VARCHAR,
  lat      DECIMAL,
  lng      DECIMAL,
  runtime  VARCHAR
);
To check the table was created correctly, run the following in your terminal.
SHOW TABLES;
Which should result in something similar to the below.
  schema_name | table_name | type  | owner | estimated_row_count | locality
--------------+------------+-------+-------+---------------------+-----------
  public      | locations  | table | paul  |                   0 | NULL
🎉 Your Cluster, database and table are now ready for some pg-promise action. In the next steps I’ll take you through how to build the sample app using Next.js.
Getting Started With pg-promise and Next.js
I think I’m somewhat alone in my thinking when it comes to spinning up new “framework” projects. I’m not a fan of running a command in the terminal and bippity boppity boo an application pops out. It’s faster for sure, but did you learn anything?
My approach is deeply rooted in the age old fable of the The Tortoise and the Hare… and we all know who won that race 🐢.
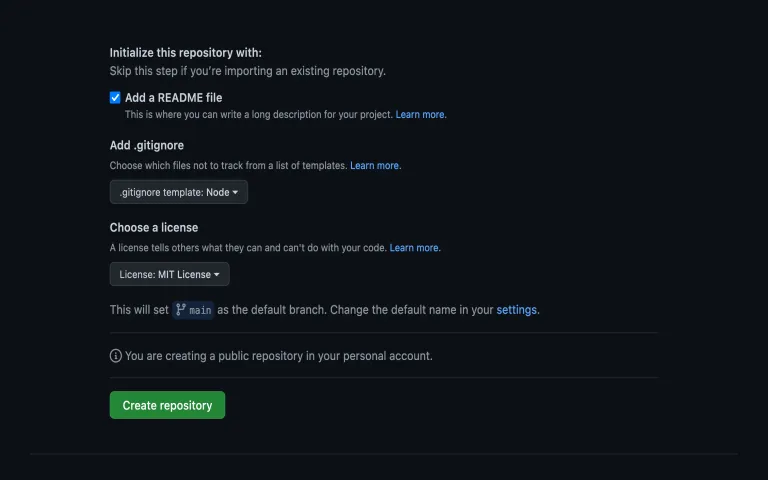
Create an Empty GitHub Repository
This is usually the first thing I’ll do when starting a new Next.js project.
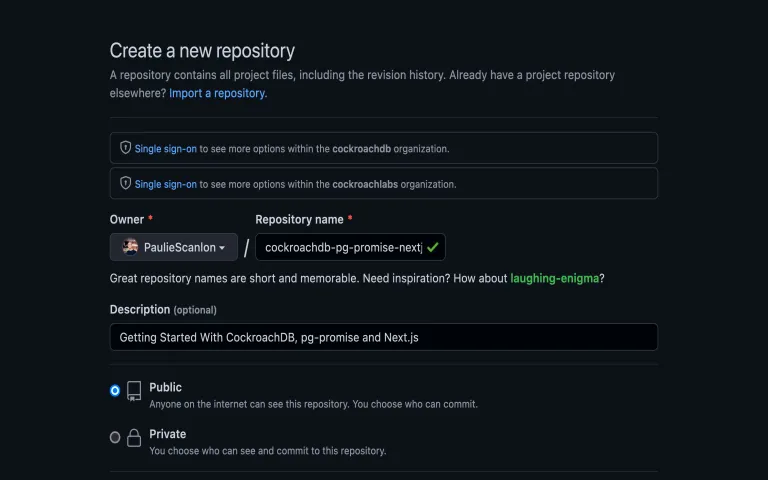
I also like to select the .gitignore and license before cloning the repository to my local development environment,
these are.
- .gitignore:
Node - License:
MIT License
If you’re following along, you’re now ready to clone the repo to you local development environment, E.g.
git clone https://github.com/PaulieScanlon/cockroachdb-pg-promise-nextjs.git
Once you’ve cloned the repository you can change directory and move inside the project directory, E.g
cd cockroachdb-pg-promise-nextjs
If you’re in the correct directory you can create a default package.json by running the following command.
npm init -y
Install Dependencies
There’s x3 dependencies you’ll need to install to use Next.js, run the following in your terminal,
npm install next react react-dom --save
There’s also a couple more dependencies you’ll need to install to build my sample application. Run the following in your terminal.
npm install pg-promise request-ip fast-geoip --save
Add Scripts
With the dependencies installed open up package.json and add the following to "scripts". You can also see this
mentioned in the Next.js docs: Manual Setup.
  "scripts": {
+    "dev": "next dev",
+    "build": "next build",
+    "start": "next start",
+    "lint": "next lint",
    "test": "echo \"Error: no test specified\" && exit 1"
  },
Environment Variables
There’s a few options in the Next.js docs for how to use environment variables here: Default Environment Variables
Go ahead and create the following at the root of your project.
.env.production.local.env.production.local
☝️ Make sure you add the names of these environment variables to your .gitignore, somewhere around Line 80, E.g.
# Next.js build output
.next
+ .env.development.local
+ .env.production.local
Inside each of the .env. files you can add the connection string you copied earlier from the
Create SQL User - DATABASE_URL step.
Here’s what my .env.development.local looks like. (I’ve replaced the password with 123).
# .env.development.local

DATABASE_URL="postgresql://paul:123@dev-test-db-6335.7tc.cockroachlabs.cloud:26257/defaultdb?sslmode=verify-full"
You may wish to repeat this process for .env.production.local and use the connection string from the prod- Cluster
if you created one in the earlier step.
pg-promise config
I borrowed this setup from an issue on the pg-promise repo. You can see the issue here:
Question re: WARNING: Creating a duplicate database object for the same connection #175
The issue relates to using pg-promise in instances where the connection might be invoked more than once. In this
sample app you’ll be using the client function in both a server-side request using getServerSideProps and from
within a Serverless Function (API Routes). You only need to create the pg-promise database instance once. The
following singleton pattern prevents duplicates from being created when client is called using the different methods
in this sample app.
Create a directory at the root of you project called db. Inside this directory create a file called index.js and add
the following code snippet.
// ./db

import pgPromise from "pg-promise";

const pgp = pgPromise();

const createSingleton = (name, create) => {
  const s = Symbol.for(name);
  let scope = global[s];
  if (!scope) {
    scope = { ...create() };
    global[s] = scope;
  }
  return scope;
};

export const client = () => createSingleton("my-app-db-space", () => pgp(process.env.DATABASE_URL));
Create A Page
Create a directory at the root of your project called pages. Inside this directory create a file called index.js and
add the following code snippet.
In the steps further down you’ll be using two different ways to communicate with the database. To make this a little easier to digest I’ve split the functionality into two different parts.
Query
When “reading” data from the database you’ll use getServerSideProps.
Mutation
When “inserting” date into or “deleting” data from the database you’ll be using Serverless Functions called from a
client side fetch request.
// pages/index.js
import React from "react";

const Page = ({ data, error }) => {
  if (error) {
    return (
      <main style={{ fontFamily: "system-ui" }}>
        <h1>Error</h1>
        <pre>{JSON.stringify(error, null, 2)}</pre>
      </main>
    );
  }

  return (
    <main style={{ fontFamily: "system-ui" }}>
      <h1>Getting Started With CockroachDB, pg-promise and Next.js</h1>
      <h2>Insert</h2>
      <p>Click submit to insert a new location</p>
      <button onClick={() => {}}>Submit</button>
      <h2>Data</h2>
      <pre>{JSON.stringify(data, null, 2)}</pre>
    </main>
  );
};

export const getServerSideProps = async () => {
  const { client } = require("../db");
  const db = client();

  try {
    const response = await db.any("SELECT * from locations");

    return {
      props: {
        data: {
          locations: response.map((res) => {
            const { id, date, city, lat, lng, runtime } = res;
            return {
              id,
              date: JSON.parse(JSON.stringify(date)),
              city,
              lat,
              lng,
              runtime
            };
          })
        }
      }
    };
  } catch (error) {
    return {
      props: {
        error: error.message
      }
    };
  }
};

export default Page;
There’s quite a lot going on here so I’ll talk you through it.
Look for getServerSideProps. This function runs on the server and can be used to get data from the database. The
require and the destructured statement for db are the pg-promise you setup earlier. Using db. you can now use the
pg-promise methods to communicate with the database.
In this page db.any is used within a try / catch statement to run a common SQL query, E.g.
SELECT * from locations
This, as you might imagine, selects everything from the table called locations.
- If the response is successful it’s returned by
getServerSidePropsto the page and made available via thedataprop. - If the response is unsuccessful, an error is returned by
getServerSidePropsand is available to the page via theerrorprop.
☝️ If there is an error I return early and display the error using an HTML <pre> element.
😊 If there is data then I return as planned, and using another HTML <pre> element show the data retrieved from the
database.
Serverless Function - Insert
The insert function works a little differently and is made up of two separate parts.
- Serverless Function created in
/pages/api/. - Client side
fetchused inside the page.
To create the Serverless Function make a new directory in pages called api. Then inside the api directory create a
new file called insert-location.js and add the following code snippet.
// pages/api/insert-location.js

const { client } = require("../../db");
const requestIp = require("request-ip");
const geoip = require("fast-geoip");

export default async function handler(req, res) {
  const db = client();
  const { date } = JSON.parse(req.body);

  try {
    const ip = await requestIp.getClientIp(req);
    const geo = await geoip.lookup(ip);

    const city = geo ? geo.city : "Greenland";
    const lat = geo ? geo.ll[0] : 65.95346100241352;
    const lng = geo ? geo.ll[1] : -44.96798528799432;

    const response = await db.one(
      "INSERT INTO locations (date, city, lat, lng, runtime) VALUES(${date}, ${city}, ${lat}, ${lng}, ${serverless}) RETURNING id",
      {
        date: date,
        city: city,
        lat: lat,
        lng: lng,
        serverless: "serverless"
      }
    );

    res.status(200).json({
      message: "A-OK!",
      data: {
        id: response.id,
        city: city,
        date: date,
        lat: lat,
        lng: lng
      }
    });
  } catch (error) {
    res.status(500).json({ message: error.message });
  }
}
Once again there’s quite a lot going on in here so I’ll talk you through it.
As before, you’ll need to require the client function along with two of the dependencies installed earlier.
requestIp and geoip are used to convert the IP address from the req object into a real geographical location.
☝️ However, when running this on http://localhost:3000/ there won’t be an IP address so there’s x3 ternary conditions
to catch null values. When running this locally the function will return details for Greenland.
The date is taken from the req.body, this ensures the date comes from the timezone of the user’s browser, not the
timezone of wherever the Serverless Function has been deployed on the Vercel (AWS) network.
These geographical locations and the date are then inserted into the database using db.one from pg-promise, the query
itself is standard SQL syntax. The only key part I’d like to ensure you notice is where it says RETURNING id. This
ensures the response actually returns the id after the row has been inserted into the table.
Following on from that I’m using res.status(200) chained with .json({}) to send the id and the other values
created by the function back to the client. You probably won’t need these, but if you want to use a console.log() in
the fetch request, (which I’ll explain next), you’d see what’s been inserted into the database table.
fetch - Insert
// pages/index.js
import React from 'react';

const Page = ({ data, error }) => {

+  const handleInsert = async () => {
+    try {
+      const response = await fetch('/api/insert-location', {
+        method: 'POST',
+        body: JSON.stringify({
+          date: new Date(),
+        }),
+      });

+      const json = await response.json();
+      console.log(json);

+      if (!response.ok) {
+        throw new Error(json.message);
+      }
+    } catch (error) {
+      console.error(error.message);
+    }
+  };


  if (error) {
    ...
  }


  return (
    <main style={{ fontFamily: 'system-ui' }}>
      <h1>Getting Started With CockroachDB, pg-promise and Next.js</h1>
      <h2>Insert</h2>
      <p>Click submit to insert a new location</p>
-     <button onClick={() => {}}>Submit</button>
+     <button onClick={handleInsert}>Submit</button>
      <h2>Data</h2>
      <pre>{JSON.stringify(data, null, 2)}</pre>
    </main>
  );
};

export const getServerSideProps = async () => {
...
};

export default Page;
This is a client-side HTTP fetch request with the method of POST. The request sends the date on the body ready to be
used in the Serverless Function. You can see the response in your browser because I’ve added console.log(json). You
might want to remove this for production.
It’s worth noting that you won’t see the page refresh when the response comes back. If you manually refresh the page you will see all the current rows in the locations table, but hang in there. There’s a special Next.js trick we can use to refresh the page after the response comes back.
Serverless Function - Delete
The delete function is similar to the insert function but a little simpler, it is also made up of to separate parts.
- Serverless Function created in
/pages/api/. - Client side
fetchused inside the page.
To create the Serverless Function make a new file called delete-location.js inside the api directory and add the
following code snippet.
// pages/api/delete-location.js

const { client } = require("../../db");

export default async function handler(req, res) {
  const db = client();
  const { id } = JSON.parse(req.body);

  try {
    await db.none("DELETE FROM locations WHERE id = $1", id);

    res.status(200).json({
      message: "A-OK!",
      data: {
        id
      }
    });
  } catch (error) {
    res.status(500).json({ message: error.message });
  }
}
As promised this function is simpler. This time the id is taken from the req.body and is used to delete a row from
the locations table in the database using db.none. There’s no need to return anything using SQL this time and all I’m
doing is returning the id back to the client so you can add console.log(json) and confirm the id that was sent was
the id that was deleted.
fetch - Delete
// pages/index.js

import React from 'react';

const Page = ({ data, error }) => {

  const handleInsert = async () => {
    ...
  };

+  const handleDelete = async (id) => {
+    try {
+      const response = await fetch('/api/delete-location', {
+        method: 'POST',
+        body: JSON.stringify({
+          id: id,
+        }),
+      });

+      const json = await response.json();
+      console.log(json);

+      if (!response.ok) {
+        throw new Error(json.message);
+      }

+    } catch (error) {
+      console.error(error.message);
+    }
+  };


  if (error) {
    ...
  }


  return (
    <main style={{ fontFamily: 'system-ui' }}>
      <h1>Getting Started With CockroachDB, pg-promise and Next.js</h1>
      <h2>Insert</h2>
      <p>Click submit to insert a new location</p>
      <button onClick={handleInsert}>Submit</button>
      <h2>Data</h2>
-      <pre>{JSON.stringify(data, null, 2)}</pre>
+      {data.locations.map((l, i) => {
+        const { id, date, city, lat, lng, runtime } = l;
+        return (
+          <dl key={i}>
+            <dt>Id</dt>
+            <dd>
+              <span>{id}</span> <button onClick={() => handleDelete(id)}>delete</button>
+            </dd>
+            <dt>Date</dt>
+             <dd>{new Date(date).toDateString()}</dd>
+            <dt>City</dt>
+            <dd>{city}</dd>
+            <dt>Latitude</dt>
+            <dd>{lat}</dd>
+            <dt>Longitude</dt>
+            <dd>{lng}</dd>
+            <dt>Runtime</dt>
+            <dd>{runtime}</dd>
+          </dl>
+        );
+      })}
    </main>
  );
};

export const getServerSideProps = async () => {
 ...
};

export default Page;
Final Touches
As mentioned earlier when you insert or delete, the page doesn’t update to show the data. Only when you manually refresh will you notice a difference. Let’s fix that!
The reason the page doesn’t update is because it’s Server-side rendered and doesn’t know about any updates that have
happened as a result of any client-side fetch requests. To remedy this you can call a refreshData() after both the
insert and delete requests come back from the Serverless Function. It works like this.
// pages/index.js

import React from 'react';
+ import { useRouter } from 'next/router';


const Page = ({ data, error }) => {
+  const router = useRouter();


+  const refreshData = () => {
+    router.replace(router.asPath, undefined, { scroll: false });
+  };


  const handleInsert = async () => {
    try {
      const response = await fetch('/api/insert-location', {
        method: 'POST',
        body: JSON.stringify({
          date: new Date(),
        }),
      });

      const json = await response.json();
+      refreshData();
      console.log(json);

      if (!response.ok) {
        throw new Error(json.message);
      }
    } catch (error) {
      console.error(error.message);
    }
  };

  const handleDelete = async (id) => {
    try {
      const response = await fetch('/api/delete-location', {
        method: 'POST',
        body: JSON.stringify({
          id: id,
        }),
      });

      const json = await response.json();
+      refreshData();
      console.log(json);

      if (!response.ok) {
        throw new Error(json.message);
      }
    } catch (error) {
      console.error(error.message);
    }
  };


  if (error) {
    ....
  }


  return (
    <main style={{ fontFamily: 'system-ui' }}>
      ...
    </main>
  );
};


export const getServerSideProps = async () => {
 ...
};

export default Page;
Deploying to Vercel
I’m not going to walk you through this as its been really well documented in the Vercel docs. All I’d like to mention is this. Earlier I mentioned creating two different Clusters, one for development (dev-), one for production (prod-). Use the production connection string when adding the environment variable to you Vercel Project.
Finished
This has been quite a journey and I hope you’ve ended up with something not to dissimilar to my sample app. If you spot any mistakes, or think there are areas that could be expanded on, please feel free to leave a comment or come and find me on Twitter: @PaulieScanlon.