How to Create an SVG Radar Chart using Astro and Tailwind
If you’re familiar with Astro you’ll likely know that a lot of effort has been made to ensure you ship less JavaScript to the browser. This approach to creating an SVG Radar Chart, using only server-side JavaScript and HTML, is very much inline with the “Astro way of life”.
If you’d like to jump ahead, here’s a public gist containing all the relevant parts to make an SVG Radar Chart using Astro Content Collections.
Getting Started
This is what I’ll show you how to make, there’s nothing to install and all I’ll be using is HTML (SVG), JavaScript and High School math.
In the first part of this post I’ll explain how to query data using content collections and transform it into the “shape” required to drive the chart, then I’ll move on to the code for the chart itself.
I’ll assume at this point you’re already using content collections and that you have some “posts” which include a tags array in the Frontmatter, e.g.
// src/content/posts/example-post.md

---
...
tags: [JavaScript, TypeScript, SVG, Data Viz]
---

# Lorem ipsum

Lorem ipsum dolor sit amet, consectetur adipiscing elit. Praesent porttitor posuere est. Morbi facilisis,
felis vitae rutrum luctus, risus orci congue nulla, non rhoncus justo neque non est
Create a Test Page
My preference while developing is to create a test page. In the below snippet i’ve created one called some-page.astro. If you have a page already in place, cool, you do you.
// src/pages/some-page.astro

---
export const prerender = true;
import { getCollection } from 'astro:content';

const posts = await getCollection('posts', ({ data }) => {
  const { tags } = data;
  if (Array.isArray(tags) && tags.length > 0) return data;
});

const groupByTag = (array) => {
  return Object.values(
    array.reduce((acc, item) => {
      const { tags } = item.data;

      tags.forEach((tag) => {
        if (!acc[tag]) {
          acc[tag] = {
            name: tag,
            total: 0,
          };
        }

        acc[tag].total++;
      });

      return acc;
    }, {})
  );
};

const data = groupByTag(posts);
console.log(data);
---

<main>
  ...
</main>
null tags
Just in case: I’ve used the second parameter of the getCollection function which gives you access to the “data” of each post and I’m using it to check for null values. In the function body I’m doing a quick check to ensure tags is an array and that it has a length greater than 0. If all is well I return the data. This might prevent errors later on when trying to group the tags.
groupByTag
The groupByTag function, unsurprisingly, groups all the tags found in the Frontmatter and counts the occurrences and then returns a new array of objects that contain a key for the name and the total. You could abstract this function away into a utils directory if you like, but for now leave it as it is.
If you’ve added console.log(data) you should see an output in your terminal similar to the below. This is the “shape” of the data required to drive the <RadarChart />, which I’ll show you next.
[
 { name: 'React', total: 9 },
 { name: 'GraphQL', total: 2 },
 { name: 'JavaScript', total: 5 },
 { name: 'SVG', total: 5 },
 { name: 'TypeScript', total: 7 },
 { name: 'Tailwind', total: 7 },
 { name: 'React Query', total: 2 },
 { name: 'Next.js', total: 3 },
]
Creating the RadarCart
The first step is to just make sure the component can receive props, and return an empty SVG to the page. Create a new component, i’ve called mine radar-chart.astro, then add the following code.
// src/components/radar-chart.astro

---
const { data } = Astro.props;

const chartSize = 400;
const chartCenter = chartSize / 2;
---

<svg xmlns='http://www.w3.org/2000/svg' viewBox={`0 0 ${chartSize} ${chartSize}`} role='presentation'>
  <g transform={`translate(${chartCenter},${chartCenter})`}>

  </g>
</svg>
Add the RadarChart to the Page
Go back to your test page (or wherever), and import the <RadarChart /> component and pass it the newly formatted tags data via a prop called data.
---
// src/pages/some-page.astro

export const prerender = true;
import { getCollection } from 'astro:content';

const posts = await getCollection('posts', ({ data }) => {
  const { tags } = data;
  if (Array.isArray(tags) && tags.length > 0) return data;
});
+ import RadarChart from '../components/radar-chart.astro';

const groupByTag = (array) => {
  return Object.values(
    array.reduce((acc, item) => {
      const { tags } = item.data;

      tags.forEach((tag) => {
        if (!acc[tag]) {
          acc[tag] = {
            name: tag,
            total: 0,
          };
        }

        acc[tag].total++;
      });

      return acc;
    }, {})
  );
};

const data = groupByTag(posts);
console.log(data);
---

<main>
-  ...
+  <RadarChart data={data} />
</main>
Setting up Defaults
There’s a few “config” options that are required, add the below to the <RadarChart> component and I’ll explain what each one does.
// src/components/radar-chart.astro

---
const { data } = Astro.props;

const chartSize = 400;
const chartCenter = chartSize / 2;

+ const colors = ['#58e6d9', '#ff6090', '#4871e3', '#ffc107', '#8bc34a'];
+ const chartData = data.sort((a, b) => b.total - a.total).slice(0, colors.length);
+ const pointPadding = 10;
+ const max = chartData.reduce((max, current) => (current.total > max ? current.total : max), 0);
+ const rings = [...Array(6).keys()];

+ const getX = (angle, value) => Math.cos(angle - Math.PI / 2) * value;
+ const getY = (angle, value) => Math.sin(angle - Math.PI / 2) * value;
---

<svg xmlns='http://www.w3.org/2000/svg' viewBox={`0 0 ${chartSize} ${chartSize}`} role='presentation'>
  <g transform={`translate(${chartCenter},${chartCenter})`}>

  </g>
</svg>
- colors: This is an array of colors to use for each point on the chart.
- chartData: This the the
datafrom thedataprop but sorted bytotaland sliced so it’s only as long as the array of colors (this will prevent points from being created with no color value) - pointPadding: This will be used later when positioning the points, which might get cut of if they’re close to the edges of the SVG. Adding padding means they’ll be bumped in slightly.
- max: This the maximum total from the
dataarray and is pretty crucial when calculating positions. - rings: This is just an empty array which will be used later with
.mapto create the rings. - getX: This function accepts an angle and a value, both are used to return an
xposition usingMath.cosand is used when plotting points. - getY: This function accepts an angle and a value, both are used to return a
yposition usingMath.sinand is used when plotting points.
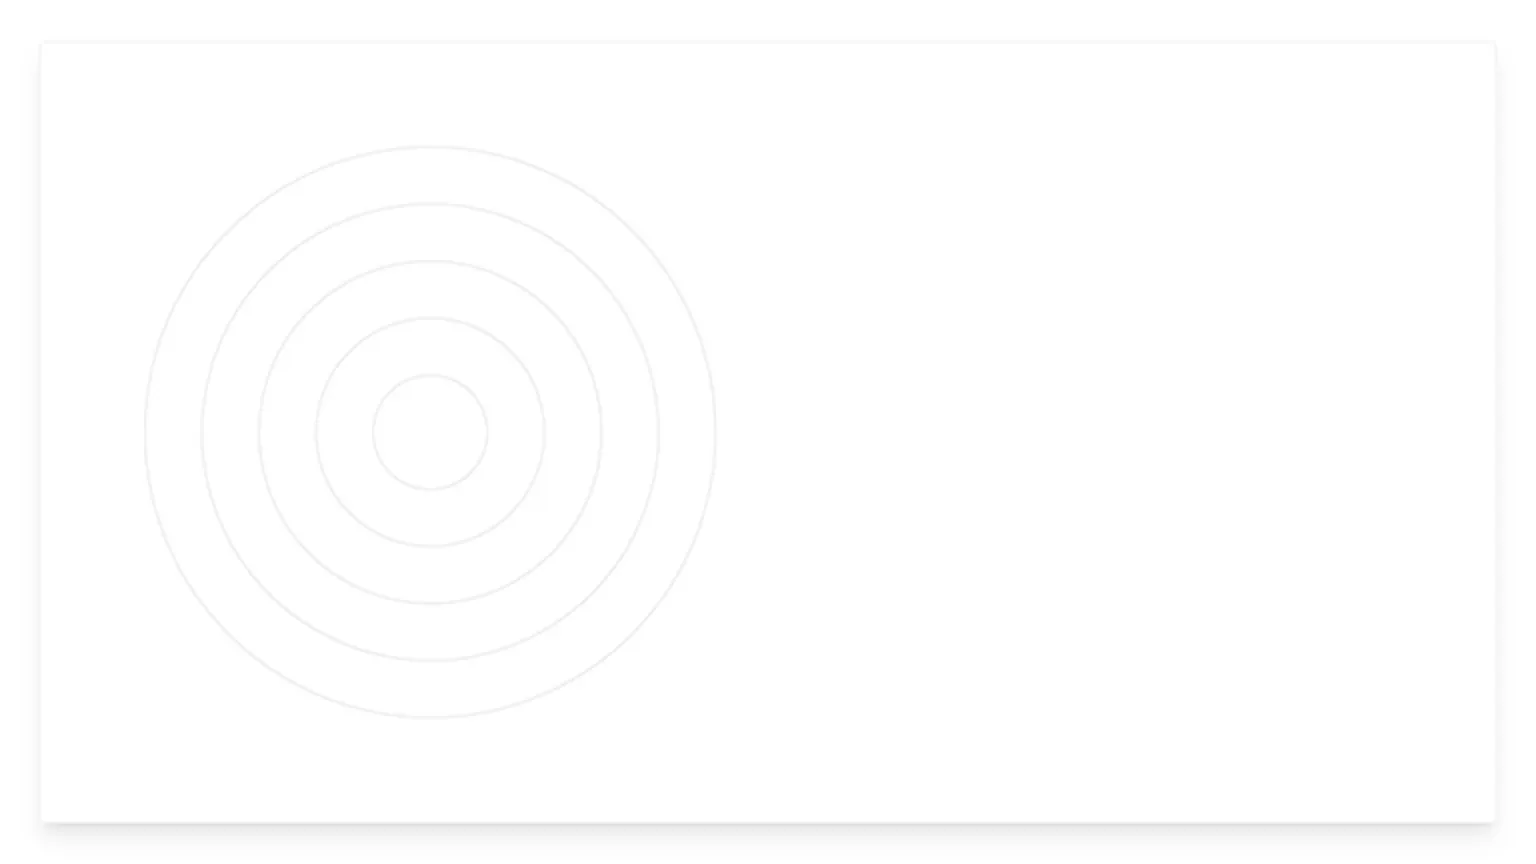
Creating the Rings
This one’s super easy, all that’s needed here is to .map over the rings array and on each iteration return a SVG <circle /> element. The only “math” bit here is the value for r, which is the radius of each ring. This is calculated using the index from the .map so each ring gets larger and larger. There’s an extra calculation tacked on to the end: (/ Number((Math.PI / 2 + 0.1).toFixed(2)), to ensure the largest ring never exceeds the bounds of the SVG.
// src/components/radar-chart.astro

---
const { data } = Astro.props;

const chartSize = 400;
const chartCenter = chartSize / 2;

const colors = ['#58e6d9', '#ff6090', '#4871e3', '#ffc107', '#8bc34a'];
const chartData = data.sort((a, b) => b.total - a.total).slice(0, colors.length);
const pointPadding = 10;
const max = chartData.reduce((max, current) => (current.total > max ? current.total : max), 0);
const rings = [...Array(6).keys()];

const getX = (angle, value) => Math.cos(angle - Math.PI / 2) * value;
const getY = (angle, value) => Math.sin(angle - Math.PI / 2) * value;


---

<svg xmlns='http://www.w3.org/2000/svg' viewBox={`0 0 ${chartSize} ${chartSize}`} role='presentation'>
  <g transform={`translate(${chartCenter},${chartCenter})`}>
+  {
+    rings.map((_, index) => {
+      return (
+        <circle
+          cx={0}
+          cy={0}
+          r={((index / rings.length) * chartSize) / Number((Math.PI / 2 + 0.1).toFixed(2))}
+          class='stroke-gray-200'
+          fill='none'
+          stroke-width={1}
+       />
+      );
+    })
+  }
  </g>
</svg>
You should now be looking at something similar to the image below.
Creating the Axes
This part looks more complicated than it is. The axes array will contain an array of points. The points are required to plot an SVG <polyline />. The SVG <polyline /> element has a points attribute which is expecting a string of comma separated numbers. These numbers are the start x, start y, and end x, and end y of a line. Calculating what these start and end numbers are is a job for the getX and getY functions created earlier.
---
const { data } = Astro.props;

const chartSize = 400;
const chartCenter = chartSize / 2;

const colors = ['#58e6d9', '#ff6090', '#4871e3', '#ffc107', '#8bc34a'];
const chartData = data.sort((a, b) => b.total - a.total).slice(0, colors.length);
const pointPadding = 10;
const max = chartData.reduce((max, current) => (current.total > max ? current.total : max), 0);
const rings = [...Array(6).keys()];

const getX = (angle, value) => Math.cos(angle - Math.PI / 2) * value;
const getY = (angle, value) => Math.sin(angle - Math.PI / 2) * value;

+ const axes = chartData.map((_, index) => {
+  const angle = (Math.PI * 2 * index) / chartData.length;
+  const x = getX(angle, chartSize / 2);
+  const y = getY(angle, chartSize / 2);
+  const points = [[0, 0], [x, y]].map((point) => point[0] + ',' + point[1]).join(' ');
+  return {
+    points: points
+  };
+ });
---

<svg xmlns='http://www.w3.org/2000/svg' viewBox={`0 0 ${chartSize} ${chartSize}`} role='presentation'>
  <g transform={`translate(${chartCenter},${chartCenter})`}>
    {
      rings.map((_, index) => {
        return (
          <circle
            cx={0}
            cy={0}
            r={((index / rings.length) * chartSize) / Number((Math.PI / 2 + 0.1).toFixed(2))}
            class='stroke-gray-200'
            fill='none'
            stroke-width={1}
          />
        );
      })
    }
+   {
+      axes.map((axis) => {
+        const { points } = axis;
+        return <polyline points={points} class='stroke-gray-200' fill='none' stroke-width={1} />;
+      })
+    }
  </g>
</svg>
You should now be looking at something similar to the image below.
… also, just in case you’re wondering, axes is the plural, axis is the singular… don’t believe me? …axis: Etymology 1.

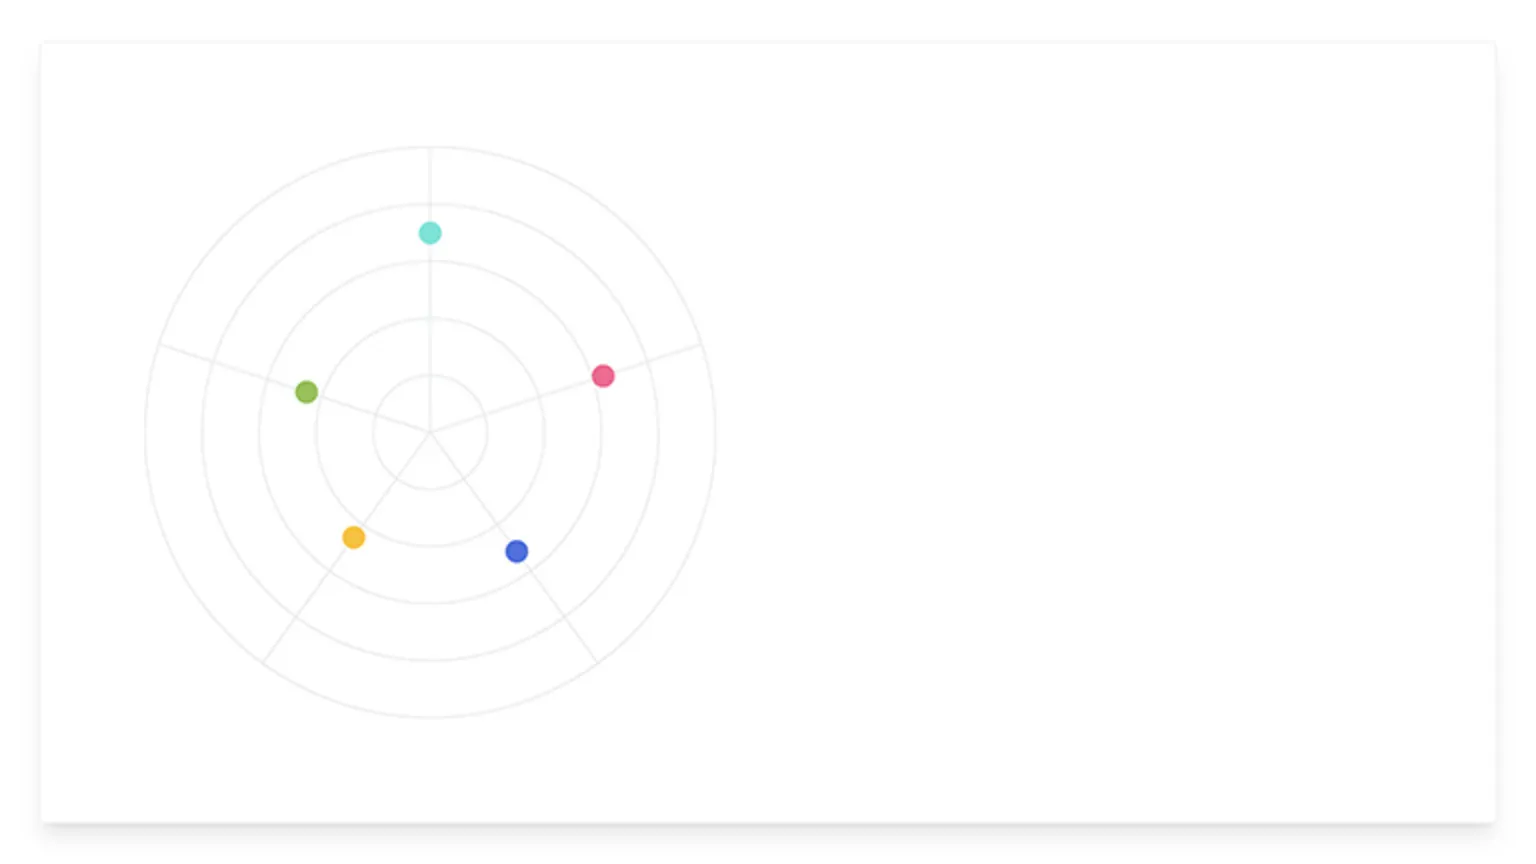
Creating the Points
This properties will be used to plot the points on the chart, and can also be used to populate the legend list. The return values here are the name of the point, a total and an x and y coordinate. These are calculated using the same getX and getY function defined earlier. The only other part to note is clamp. To ensure the coordinates don’t exceed the chart bounds a quick calculation is required and it’s here where the max value is used.
You can then iterate over the properties array and return a <g> element which is positioned correctly. The SVG <g> element is one of only a few SVG element that accepts children, as such I’ve added a child <circle /> element (which is the dot).
I’ve added the <g> in case you’d like to add any further elements to the chart. Anything inside the <g> will be positioned correctly using the coordinates.
---
const { data } = Astro.props;

const chartSize = 400;
const chartCenter = chartSize / 2;

const colors = ['#58e6d9', '#ff6090', '#4871e3', '#ffc107', '#8bc34a'];
const chartData = data.sort((a, b) => b.total - a.total).slice(0, colors.length);
const pointPadding = 10;
const max = chartData.reduce((max, current) => (current.total > max ? current.total : max), 0);
const rings = [...Array(6).keys()];

const getX = (angle, value) => Math.cos(angle - Math.PI / 2) * value;
const getY = (angle, value) => Math.sin(angle - Math.PI / 2) * value;

const axes = chartData.map((_, index) => {
  const angle = (Math.PI * 2 * index) / chartData.length;
  const x = getX(angle, chartSize / 2);
  const y = getY(angle, chartSize / 2);
  const points = [
    [0, 0],
    [x, y],
  ]
    .map((point) => point[0] + ',' + point[1])
    .join(' ');
  return {
    points: points,
  };
});

+ const properties = chartData.map((item, index) => {
+  const { name, total } = item;
+  const clamp = Number(total / (max + pointPadding));
+  const angle = (Math.PI * 2 * index) / chartData.length;
+  const x = getX(angle, (clamp * chartSize) / 2);
+  const y = getY(angle, (clamp * chartSize) / 2);
+  return { name: name, total: total, x: x, y: y };
+ });
---

<svg xmlns='http://www.w3.org/2000/svg' viewBox={`0 0 ${chartSize} ${chartSize}`} role='presentation'>
  <g transform={`translate(${chartCenter},${chartCenter})`}>
    {
      rings.map((_, index) => {
        return (
          <circle
            cx={0}
            cy={0}
            r={((index / rings.length) * chartSize) / Number((Math.PI / 2 + 0.1).toFixed(2))}
            class='stroke-gray-200'
            fill='none'
            stroke-width={1}
          />
        );
      })
    }
    {
      axes.map((axis) => {
        const { points } = axis;
        return <polyline points={points} class='stroke-gray-200' fill='none' stroke-width={1} />;
      })
    }
+    {
+      properties.map((property, index) => {
+        const { x, y } = property;
+
+        return (
+          <g transform={`translate(${x},${y})`}>
+            <circle cx={0} cy={0} r={8} fill={colors[index]} />
+          </g>
+        );
+      })
+    }
  </g>
</svg>
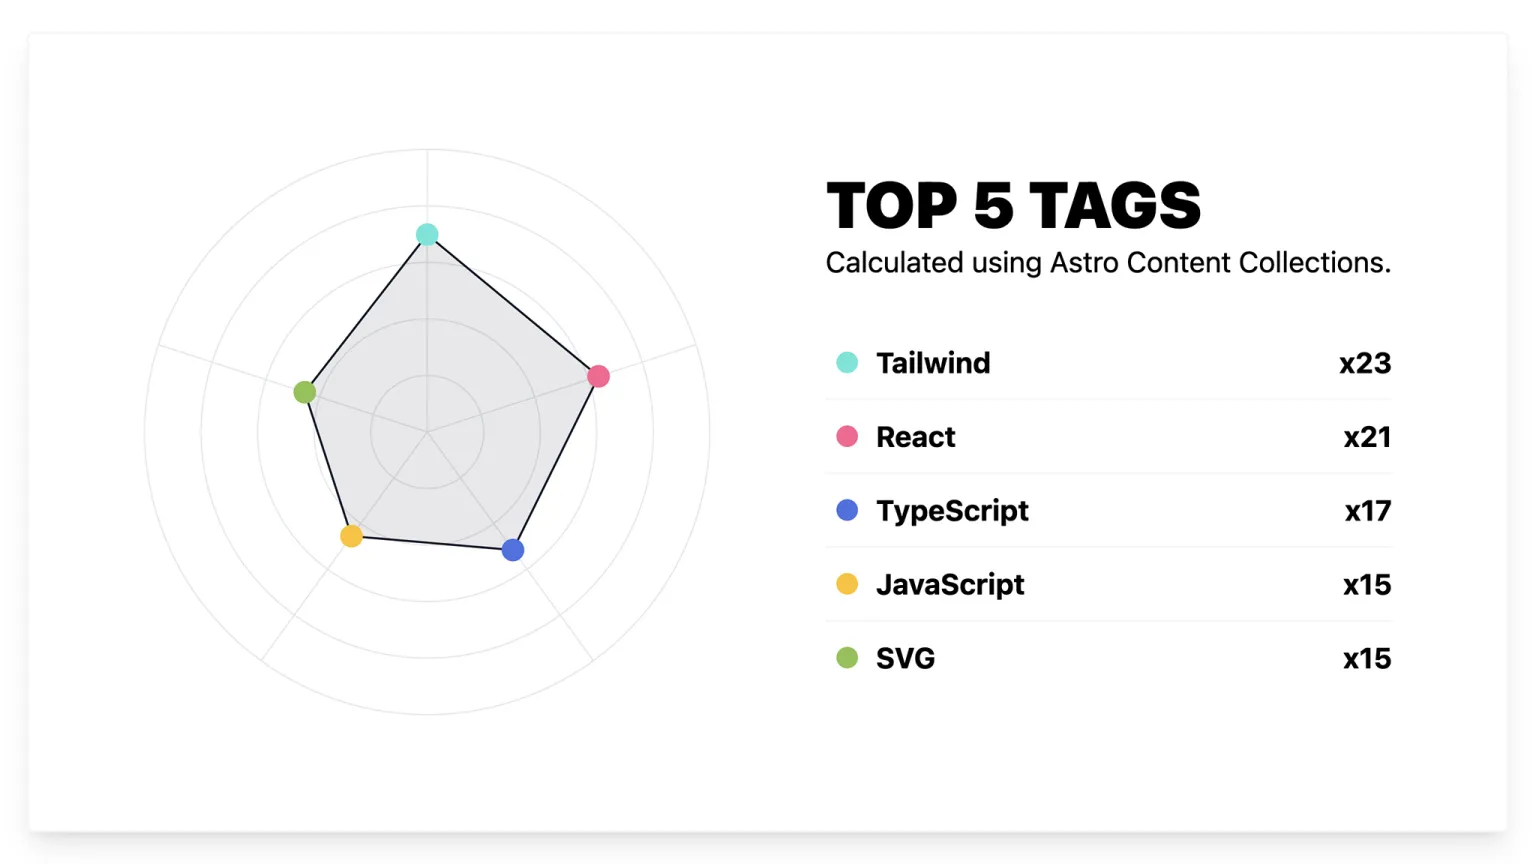
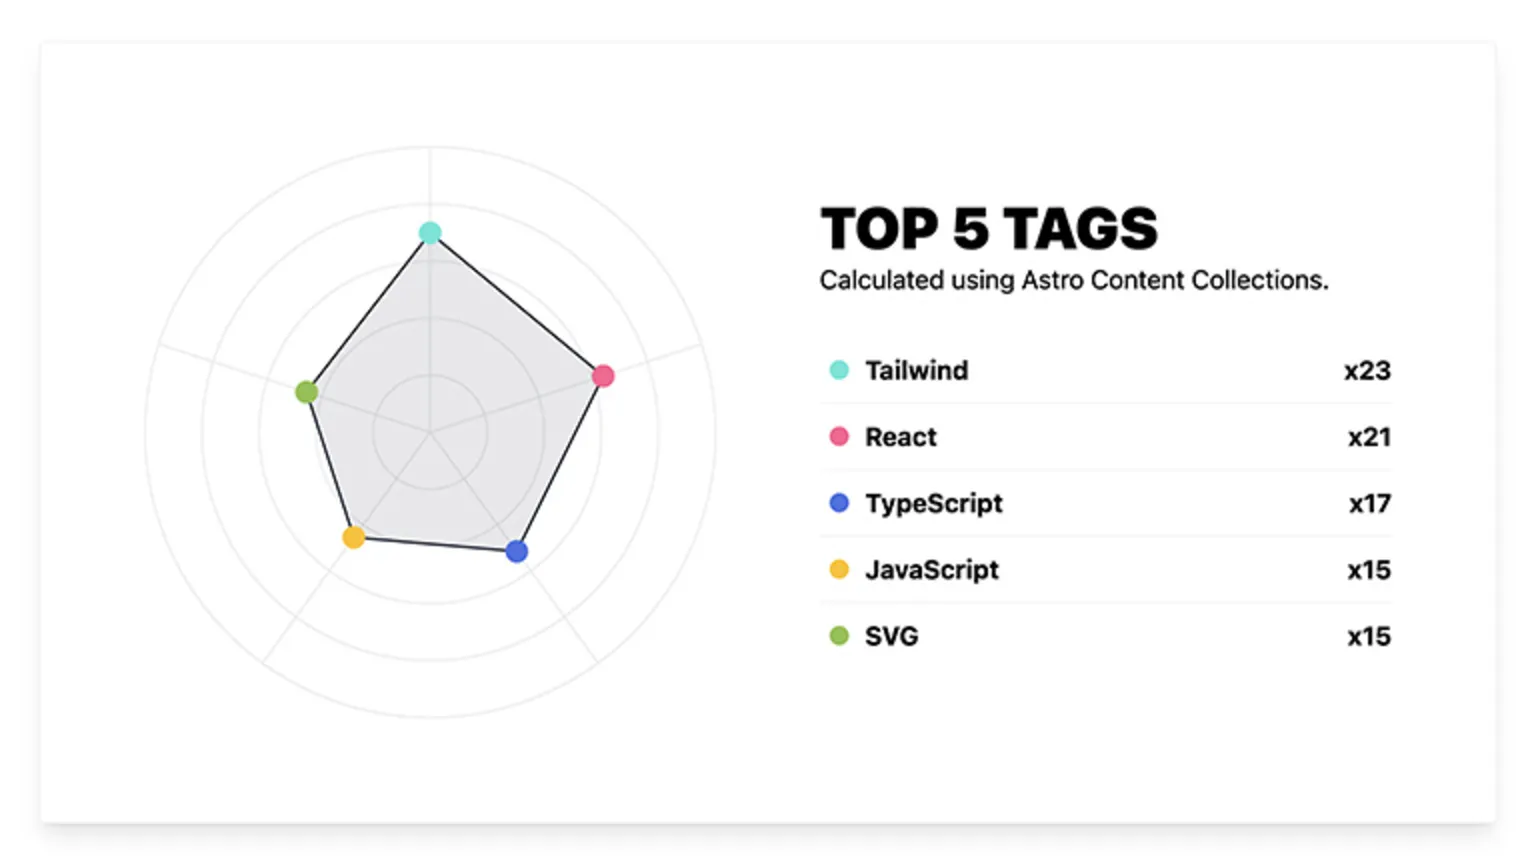
You should now be looking at something similar to the image below.
Creating the Shape
The final step is to draw a shape between all the points, add a stroke and fill it with a transparent color. I’ve used an SVG <path /> element to draw the shape. To construct a string suitable for use with the <path /> element I iterate over each property and construct a string using the x and y coordinates.
The complete string should look something like this
M1.0135007992943613e-14,-165.51724137931035L154.13674574438693,-50.082064605594915L93.2349020877716,128.3268335905089L-28.375839765843526,39.05599283189402L-42.63356797185172,-13.852485954739016z
This is how an SVG path works.
- M: This means
movetoand will be where the start of a path is drawn. - L: Ths means
linetoand requires two numbers, the first is thexcoordinate, the second is theycoordinate. - z: This means
closepath, without it you’ll end up with an incomplete stroke.zjoins the lastLposition(s) with the firstMposition(s).
---
const { data } = Astro.props;

const chartSize = 400;
const chartCenter = chartSize / 2;

const colors = ['#58e6d9', '#ff6090', '#4871e3', '#ffc107', '#8bc34a'];
const chartData = data.sort((a, b) => b.total - a.total).slice(0, colors.length);
const pointPadding = 10;
const max = chartData.reduce((max, current) => (current.total > max ? current.total : max), 0);
const rings = [...Array(6).keys()];

const getX = (angle, value) => Math.cos(angle - Math.PI / 2) * value;
const getY = (angle, value) => Math.sin(angle - Math.PI / 2) * value;

const axes = chartData.map((_, index) => {
  const angle = (Math.PI * 2 * index) / chartData.length;
  const x = getX(angle, chartSize / 2);
  const y = getY(angle, chartSize / 2);
  const points = [
    [0, 0],
    [x, y],
  ]
    .map((point) => point[0] + ',' + point[1])
    .join(' ');
  return {
    points: points,
  };
});

const properties = chartData.map((item, index) => {
  const { name, total } = item;
  const clamp = Number(total / (max + pointPadding));
  const angle = (Math.PI * 2 * index) / chartData.length;
  const x = getX(angle, (clamp * chartSize) / 2);
  const y = getY(angle, (clamp * chartSize) / 2);
  return { name: name, total: total, x: x, y: y };
});

+ const shape =
+  properties.reduce((items, item, index) => {
+    const { x, y } = item;
+    const string = `${index === 0 ? 'M' : 'L'}${x},${y}`;
+    return items + string;
+ }, '') + 'z';
---

<svg xmlns='http://www.w3.org/2000/svg' viewBox={`0 0 ${chartSize} ${chartSize}`} role='presentation'>
  <g transform={`translate(${chartCenter},${chartCenter})`}>
    {
      rings.map((_, index) => {
        return (
          <circle
            cx={0}
            cy={0}
            r={((index / rings.length) * chartSize) / Number((Math.PI / 2 + 0.1).toFixed(2))}
            class='stroke-gray-200'
            fill='none'
            stroke-width={1}
          />
        );
      })
    }
    {
      axes.map((axis) => {
        const { points } = axis;
        return <polyline points={points} class='stroke-gray-200' fill='none' stroke-width={1} />;
      })
    }
+   <path d={shape} class='stroke-gray-900 fill-gray-900/10' stroke-width={1.5}></path>
    {
      properties.map((property, index) => {
        const { x, y } = property;

        return (
          <g transform={`translate(${x},${y})`}>
            <circle cx={0} cy={0} r={8} fill={colors[index]} />
          </g>
        );
      })
    }
  </g>
</svg>
You should now be looking at something similar to the image below.

That completes the SVG part of this post. The final step is to create the legend.
Creating the Legend
The general idea here is, create a list. How and where you position this in relation to the chart is up to you. I’ve opted for putting it next to the chart on larger screens, then stacking it below the chart on smaller screens. In any case, that will be handled by the surrounding HTML elements and CSS. The below snippet is just to show how to display the values from the properties array.
const { data } = Astro.props;

const chartSize = 400;
const chartCenter = chartSize / 2;

const colors = ['#58e6d9', '#ff6090', '#4871e3', '#ffc107', '#8bc34a'];
const chartData = data.sort((a, b) => b.total - a.total).slice(0, colors.length);
const pointPadding = 10;
const max = chartData.reduce((max, current) => (current.total > max ? current.total : max), 0);
const rings = [...Array(6).keys()];

const getX = (angle, value) => Math.cos(angle - Math.PI / 2) * value;
const getY = (angle, value) => Math.sin(angle - Math.PI / 2) * value;

const axes = chartData.map((_, index) => {
  const angle = (Math.PI * 2 * index) / chartData.length;
  const x = getX(angle, chartSize / 2);
  const y = getY(angle, chartSize / 2);
  const points = [
    [0, 0],
    [x, y],
  ]
    .map((point) => point[0] + ',' + point[1])
    .join(' ');
  return {
    points: points,
  };
});

const properties = chartData.map((item, index) => {
  const { name, total } = item;
  const clamp = Number(total / (max + pointPadding));
  const angle = (Math.PI * 2 * index) / chartData.length;
  const x = getX(angle, (clamp * chartSize) / 2);
  const y = getY(angle, (clamp * chartSize) / 2);
  return { name: name, total: total, x: x, y: y };
});

const shape =
  properties.reduce((items, item, index) => {
    const { x, y } = item;
    const string = `${index === 0 ? 'M' : 'L'}${x},${y}`;
    return items + string;
  }, '') + 'z';
---

<svg xmlns='http://www.w3.org/2000/svg' viewBox={`0 0 ${chartSize} ${chartSize}`} role='presentation'>
  <g transform={`translate(${chartCenter},${chartCenter})`}>
    {
      rings.map((_, index) => {
        return (
          <circle
            cx={0}
            cy={0}
            r={((index / rings.length) * chartSize) / Number((Math.PI / 2 + 0.1).toFixed(2))}
            class='stroke-gray-200'
            fill='none'
            stroke-width={1}
          />
        );
      })
    }
    {
      axes.map((axis) => {
        const { points } = axis;
        return <polyline points={points} class='stroke-gray-200' fill='none' stroke-width={1} />;
      })
    }
    <path d={shape} class='stroke-gray-900 fill-gray-900/10' stroke-width={1.5}></path>
    {
      properties.map((property, index) => {
        const { x, y } = property;

        return (
          <g transform={`translate(${x},${y})`}>
            <circle cx={0} cy={0} r={8} fill={colors[index]} />
          </g>
        );
      })
    }
  </g>
</svg>

+  <ul class='list-none m-0 p-0'>
+    {
+      properties.map((property, index) => {
+        const { name, total } = property;
+
+        return (
+          <li class='m-0 p-0 flex items-center justify-between border-b border-b-transparent [&:not(:last-child)]+:border-b-gray-100 leading-10'>
+            <div class='flex items-center gap-1'>
+              <svg xmlns='http://www.w3.org/2000/svg' viewBox='0 0 24 24' width={24} height={24} role='presentation'>
+                <circle cx={12} cy={12} r={6} fill={colors[index]} />
+              </svg>
+              <strong>{name}</strong>
+            </div>
+            <strong>{`x${total}`}</strong>
+          </li>
+        );
+      })
+    }
+  </ul>
And that’s it! You should now be looking at the finished chart complete with a legend, and if you missed the link above, here’s a public gist with all the completed. code.
Lemme know how you get on with this. I love Data Viz and I love hand cranking my own visualizations even more!
I’ve got a few more Astro related blog posts coming up so give me, @PaulieScanlon, or @neondatabase a follow on Twitter / X.