How to Send email using Gmail and GitHub Actions
If you’ve found yourself here, you’re probably looking for a way to send an email using GitHub Actions. Great—I needed to do this too! I’ll briefly explain why, then jump straight into the code.
I was exploring the Neon API to better understand how to manage branches. In Neon, branches work similarly to code branches: you can create an isolated copy of your production database to work on safely without messing up production. However, in a large team where developers are constantly spinning up new branches, things can quickly get out of hand. I wanted a way to track when a branch was last used and automatically delete any that were older than a certain threshold.
My goal was simple: Set up a GitHub Action that runs nightly at midnight to identify stale database branches and delete any older than 30 days. I got it working and shared it with the team—only to face some pushback. Deleting a developer’s branch without warning felt a bit harsh. Fair point.
Since my method for detecting and deleting stale branches runs as a recurring GitHub Action, I decided to first notify developers via email. If their branch was flagged as stale, they’d get a warning. If they didn’t take action, well… I’d proceed with the ruthless cleanup.
Prerequisites
- This post uses Gmail as the email provider
- You’ll need to enable Two-factor authentication (2FA) in your Google account
- You’ll need access to both Actions and Settings for a GitHub repository
Getting Started
Setting this up involves a few steps. While you can send emails directly from the Action workflow using an SMTP client, I found it easier to use Nodemailer and run it from a JavaScript file, which is triggered by the Action workflow.
I’ll start with the code and repository setup, then move on to configuring the Google Account.
Code and repository setup
In your repository, create the following directories and files. The send-email.mjs file handles sending the email, while send-email.yml is the GitHub Action workflow that schedules the task and triggers the JavaScript file.
.github
  |-- scripts
      |-- send-email.mjs
  |-- workflows
      |-- send-email.yml
package.json
Check the type in package.json is set to "module". This enables you to use ES6 syntax in your JavaScript, for example:
"type": "module",
Install dependencies
You’ll need two dependencies: nodemailer for sending emails and dotenv to access environment variables stored as GitHub Secrets within the JavaScript function.
npm install nodemailer dotenv
GitHub Action
Copy the below code snippet and paste it into send-email.yml
name: Send Email

on:
  schedule:
    - cron: '0 0 * * *' # Runs at midnight UTC
  workflow_dispatch:

env:
  GMAIL_APP_PASSWORD: ${{ secrets.GMAIL_APP_PASSWORD }}

jobs:
  send-email:
    runs-on: ubuntu-latest

    steps:
      - name: Checkout Repository
        uses: actions/checkout@v4

      - name: Setup Node.js
        uses: actions/setup-node@v4
        with:
          node-version: '20'

      - name: Install Dependencies
        run: |
          npm install

      - name: Send Email
        run: |
          node .github/scripts/send-email.mjs
The schedule at the top follows POSIX cron syntax and is currently set to run every night at midnight (UTC). Feel free to adjust this based on your needs. The workflow_dispatch event allows you to trigger the workflow manually from the GitHub UI.
I’ll cover how to create the GMAIL_APP_PASSWORD environment variable in a later step.
The remaining steps involve checking out the repository, setting up Node.js, installing dependencies, and running send-email.mjs.
JavaScript function
Copy the below code snippet and paste it into send-email.mjs
import nodemailer from 'nodemailer';
import 'dotenv/config';
const transporter = nodemailer.createTransport({
service: 'Gmail',
host: 'smtp.gmail.com',
port: 465,
secure: true,
auth: {
user: 'pauliescanlon@gmail.com',
pass: process.env.GMAIL_APP_PASSWORD,
},
});
(async () => {
// Neon API logic ran here, returning values to include in the body of the email.
let branch_id = 'little-salad-123';
let days = 3;
let email = 'developer-abc@acme.co';
try {
await transporter.sendMail({
from: '"Warning | DevOps" <pauliescanlon@gmail.com>',
to: email,
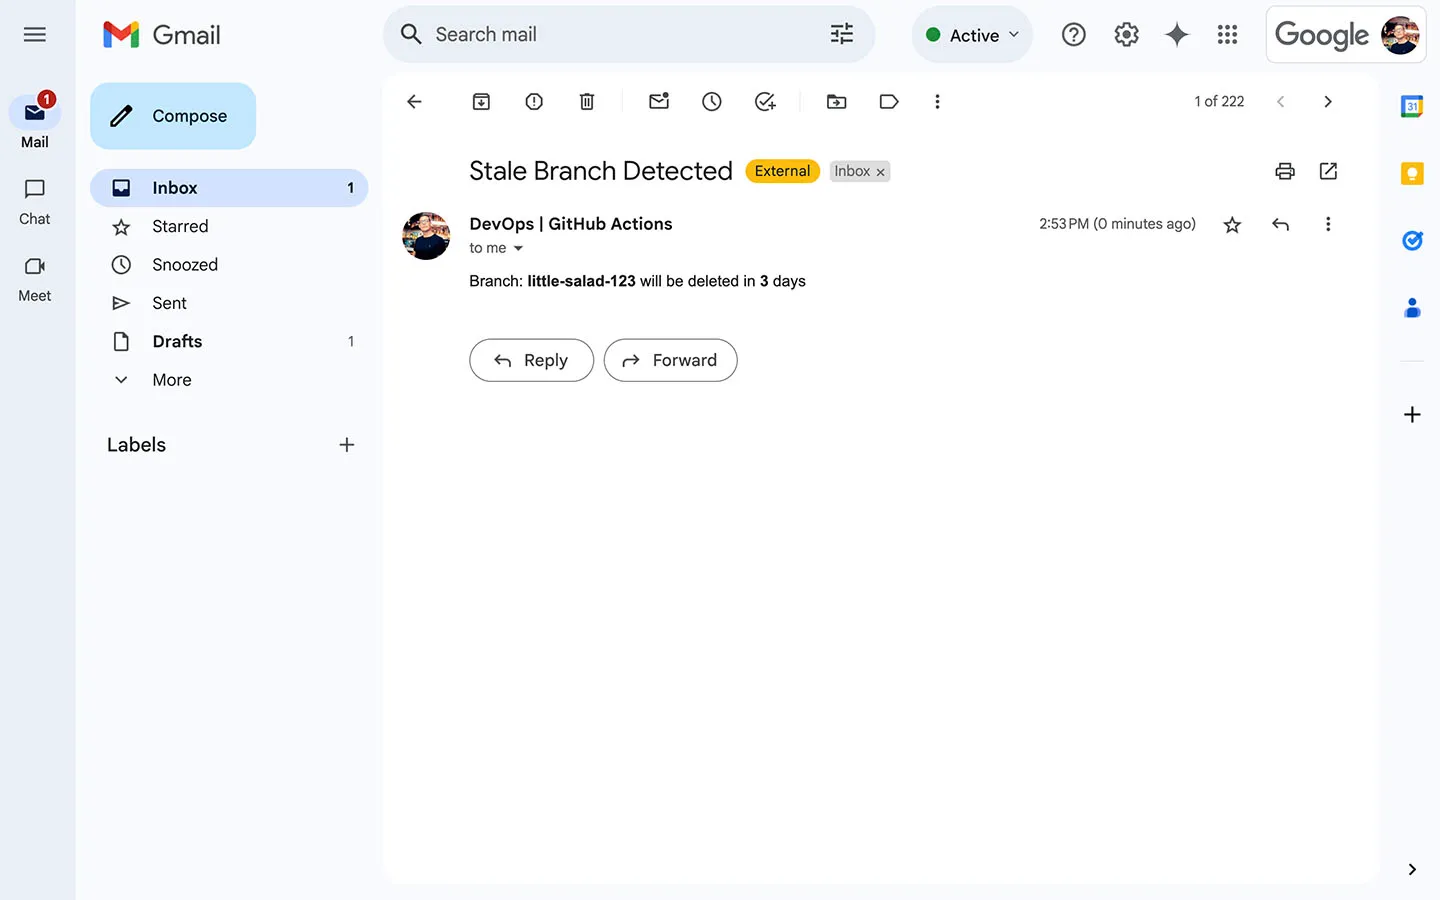
subject: 'Stale Branch Detected!',
html: `Branch: <b>${branch_id}</b> will be deleted in <b>${days}</b> days`,
});
} catch (error) {
console.error(error);
}
})();
You’ll need to update the email address in the createTransport constructor. The user should match the email address associated with the App password, which I’ll explain in the next step.
In the sendMail function, you can configure the settings to suit your needs. I’ve noticed that it doesn’t matter which email address you use in the from field; the email will always be sent from the address defined in the user field of the createTransport constructor.
If you’d prefer to test this locally instead of running the GitHub Action, use the following command in your terminal:
node .github/scripts/send-email.mjs
Google Account configuration
In your browser head over to your Google Account security settings: Security. Scroll down to How you sign in to Google and check that 2-Step verification is switched on.
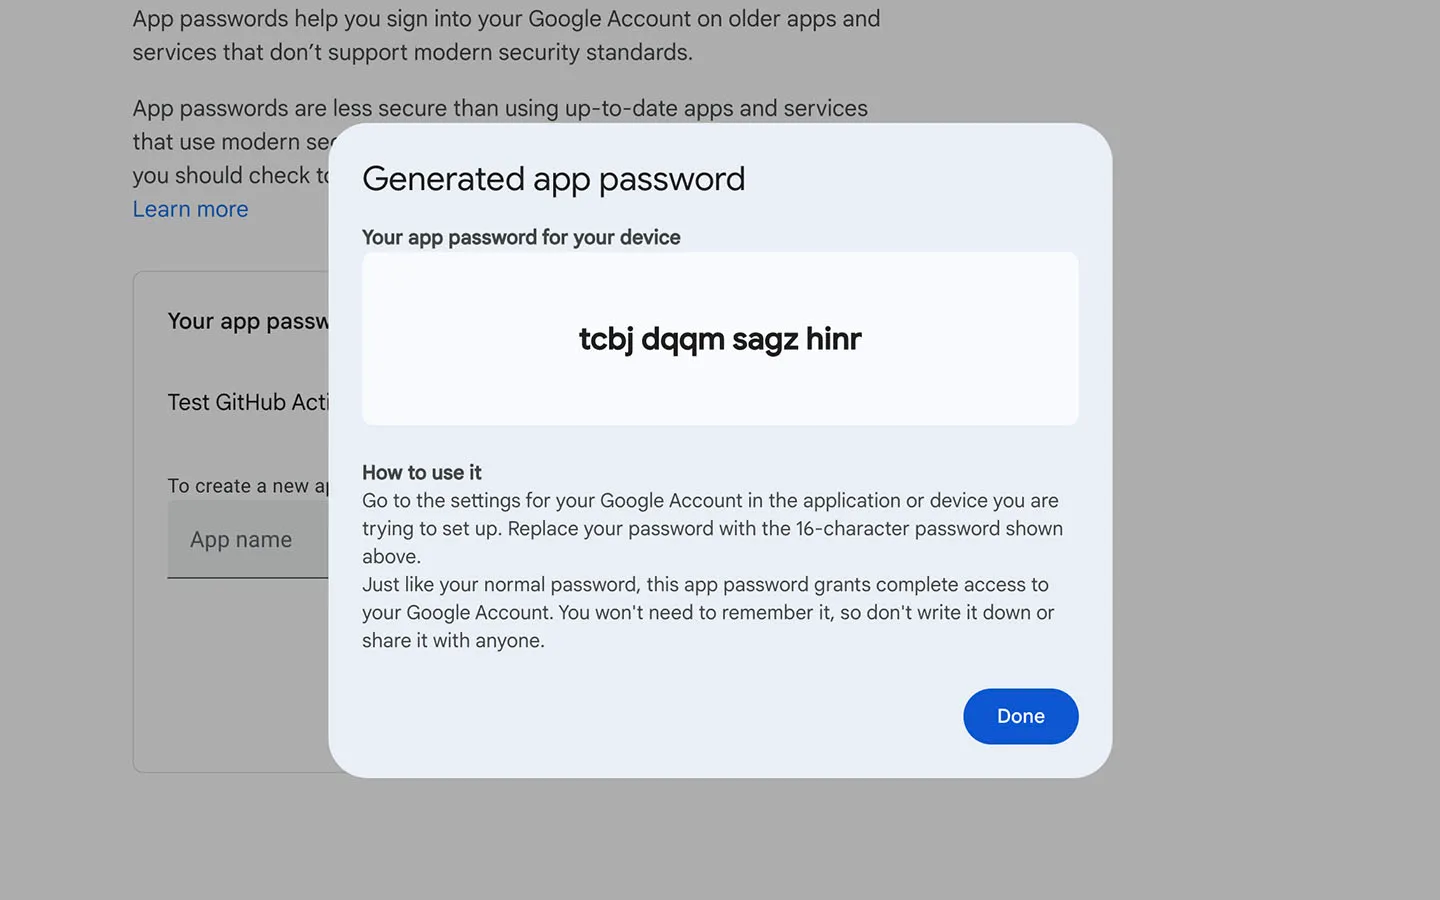
Now visit App passwords, and create a new App. Once you’ve given your App a name, you’ll see the below screen.
Create a new file at the root of your project named .env and create a new variable named GMAIL_APP_PASSWORD, for example:
GMAIL_APP_PASSWORD=123 abc
Copy the App password and paste it into your .env file. You’ll only be shown this once. If you don’t make a note of the App password, you’ll have to delete the App and create a new one.
GitHub Secrets
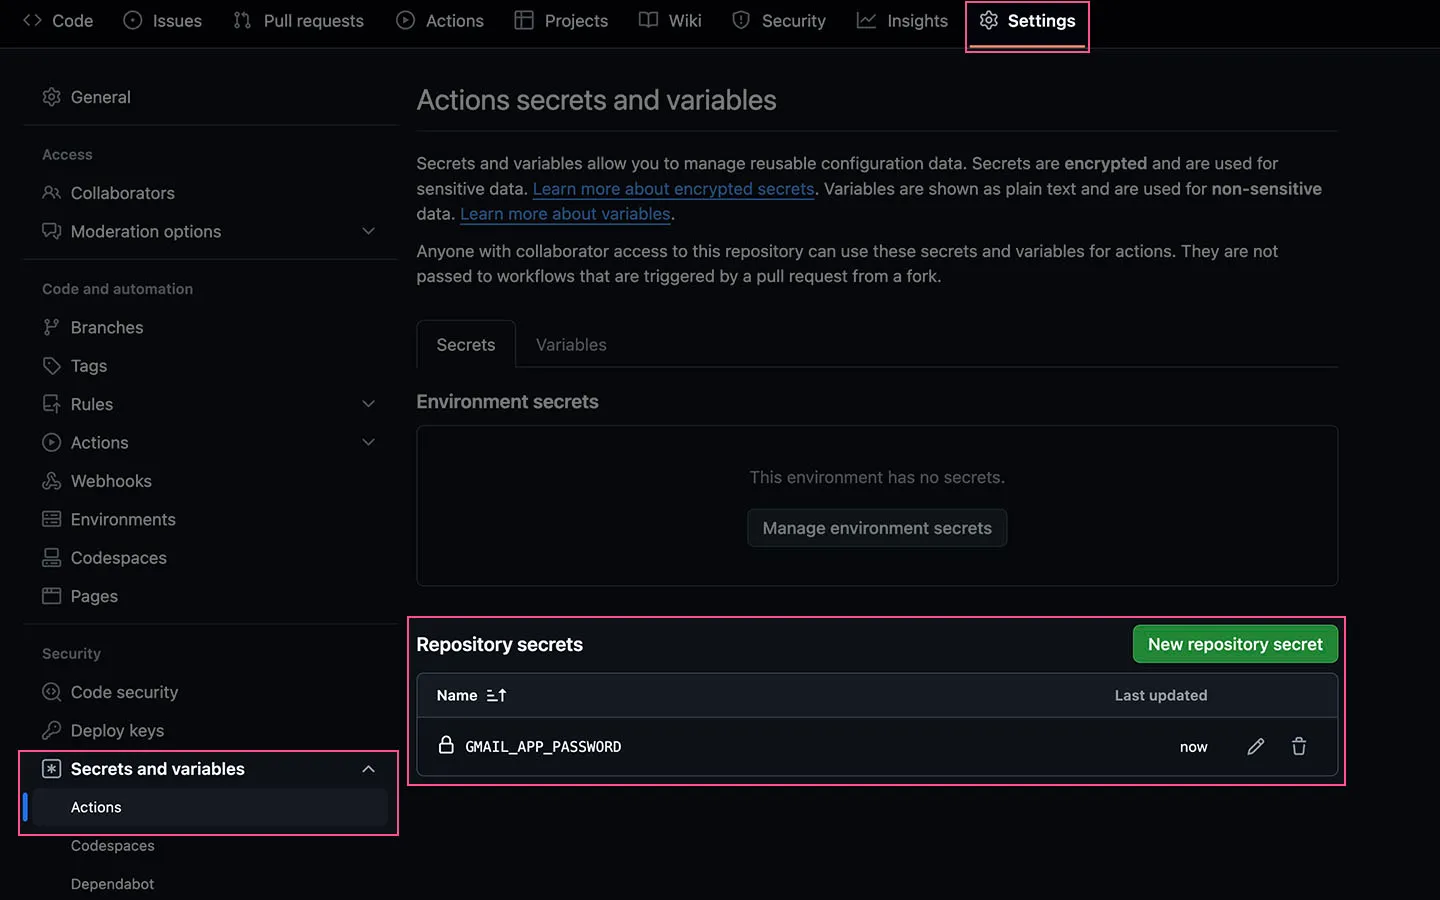
In your repository, go to Settings > Secrets and variables > Actions. Then, create a new secret named GMAIL_APP_PASSWORD under Repository secrets and add the value of your App password.
Test the Action
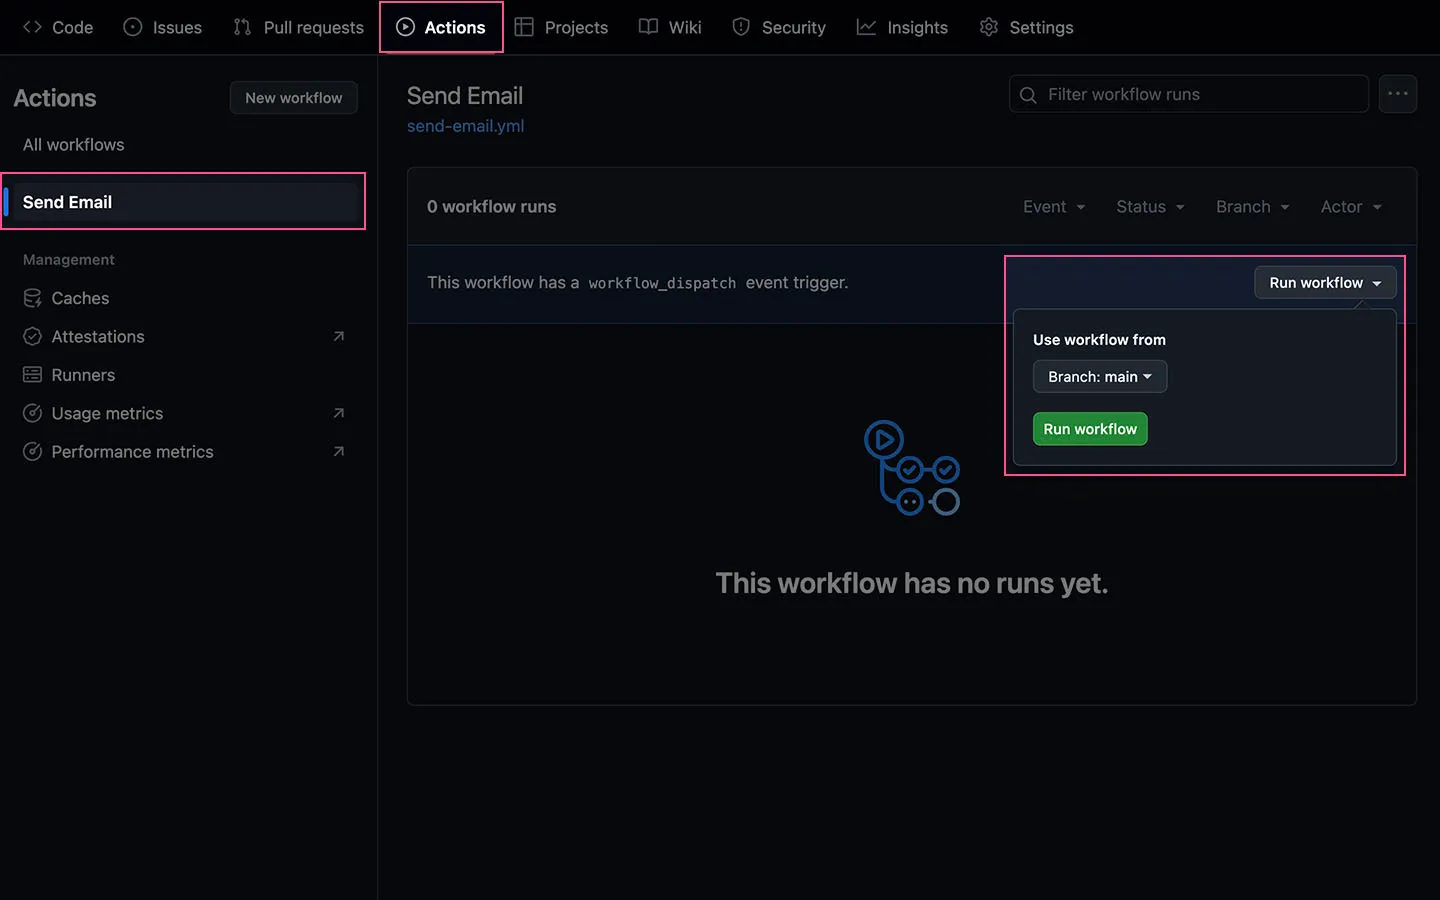
To test the Action, go to Actions and click on Send Email. Then, click Run workflow, and in the dropdown, click Run workflow again.
Finished
If you’ve done all of the above, you should have received an email! Here’s an example of what mine currently looks like.